By Mouhamadou Diaw
Nowadays, replicating data is very important. Many tools exist in the market (Goldengate, Dbvisit …). In this article we talk about a Dell Product tool that can be used for data replication: SharePlex. The goal is to show how it is easy to setup a SharePlex environment for replicating data.
After installing the software we will replicate scott schema to a target database into a new schema named scott_str1
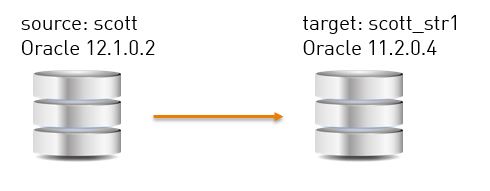
We present below the environment we use
| Server | Database | Oracle Version | |
| atlas | SPLEXDB | 12.1.0.2 | Source |
| atlasrep | SPLEXSTR1 | 11.2.0.4 | Target |
1- Installation on both source and target
The first step is to install the SharePlex software, the downlod page is https://www.quest.com/products/shareplex/.
For the intallation we need two directories on both source and target servers:
Product directory: stores programs and libraries
Variable-data directory: stores queues, log files and other components files
Note: For some steps we will only show outputs for the source
|
1
2
|
[oracle@atlas app]$ mkdir -p /u01/app/shareplex/splex_864_12_bin[oracle@atlas app]$ mkdir -p /u01/app/shareplex/splex_864_12_var |
Now Let’s unzip the downloded file and after execute the .tpm resulting file on both source and target
|
1
2
3
4
5
6
7
8
9
10
11
12
13
14
15
16
17
18
19
20
21
22
23
24
25
26
27
28
29
30
31
32
33
34
35
36
37
38
39
40
41
42
43
44
45
46
47
48
49
50
51
|
[oracle@atlas shareplex]$ tar xvf shareplex-8.6.4-b66-oracle120-rh-40-amd64-m64.tarSharePlex-8.6.4-b66-oracle120-rh-40-amd64-m64.tpm[oracle@atlas shareplex]$ ./SharePlex-8.6.4-b66-oracle120-rh-40-amd64-m64.tpmUnpacking .................................................................. ............................SharePlex installation program: SharePlex Version: 8.6.4 Build platform: rh-40-amd64 Target platform: lin-amd64Please enter the product directory location?/u01/app/shareplex/splex_864_12_binPlease enter the variable data directory location?/u01/app/shareplex/splex_864_12_varPlease specify the SharePlex Admin group (select a number):1. [oinstall]2. osdba3. osasm4. dba5. osoper6. vboxsf7. oracle? 1Please wait while the installer obtains Oracle information ..Please enter the ORACLE_SID that corresponds to this installation? [SPLEXDB]Please enter the ORACLE_HOME directory that corresponds to this ORACLE_SID? [/u01/app/oracle/product/12.1.0.2/dbhome_1]Please enter the TCP/IP port number for SharePlex communications? [2100]Preparing to install SharePlex for Oracle v.8.6.4: User: oracle Admin Group: oinstall Product Directory: /u01/app/shareplex/splex_864_12_bin Variable Data Directory: /u01/app/shareplex/splex_864_12_var ORACLE_SID: SPLEXDB ORACLE_HOME: /u01/app/oracle/product/12.1.0.2/dbhome_1Proceed with installation? [yes]Please enter the License key? ENGMFYD3X0P2SV88Y6PLHF0DVJXJAB5SY4Please enter the customer name associated with this license key? DBISharePlex v. 8.6.4 license validation successful: Customer Name: XXXXX License Key: XXXXXXXXXXXXXXXXXXXXXXXXX Product Name: SharePlex for Oracle - RAC License Key Type: "Trial Key" Expires: at Midnight of Jul 04, 2016NOTE: You can upgrade this license key or add license keys for additional machines by executing utility /u01/app/shareplex/splex_864_12_bin/install/splex_add_key.Installation log saved to: /home/oracle/.shareplex/INSTALL-SharePlex-8.6.4-1606091325.logSharePlex for Oracle v.8.6.4 installation successful.[oracle@atlas shareplex]$ |
Wow SharePlex installation is finished.
2- Database preparation
The initial load on the target must me done. Datapump may help for this. Just export data from the source and import it on the target.
Minimal supplemental logging must be set before you activate the SharePlex replication configuration. In addition, SharePlex recommends that both primary key and unique key supplemental logging be set. In this article we will only activate minimal supplemental logging.
|
1
2
3
4
5
6
7
8
9
10
11
12
13
14
15
|
SQL> select name,supplemental_log_data_min from v$database;NAME SUPPLEME--------- --------SPLEXDB NOSQL> ALTER DATABASE ADD SUPPLEMENTAL LOG DATA;Database altered.SQL> select name,supplemental_log_data_min from v$database;NAME SUPPLEME--------- --------SPLEXDB YES |
SharePlex will create a user in the database so it is recommended to create dedicated tablespaces for this user
3- Define a new variable-data directory on both source and target
When configuring a replication configuration, it is recommended to use different variable-data directory other than the one mentioned during the installation. The main reason is that by doing that we will have one working directory for each replication. What we need is just to create a new directory and to copy the contents of the default variable-data directory in the new one. Remark the naming for the new var directory (dbname_shareplexverion_oracleversion_port). Of course feel free for your naming. But it is useful to adopt a naming that can help for identifying the replication as we can have many configurations in the same server
|
1
2
3
|
[oracle@atlas splex_864_12_var]$ pwd/u01/app/shareplex/splex_864_12_var[oracle@atlas splex_864_12_var]$ cp -R * /u01/app/shareplex/vardir/splexdb_864_12_2103 |
4- Configure SharePlex on both source and target
To configure SharePlex we have to run the ora_setup file. Before launching the ora_setup file, we set some variables. Just note that we can use a different port than the one we specified in the installation process The only requirement is that ports should have same value on both source and target
|
1
2
3
4
5
6
7
|
[oracle@atlas bin]$ env | grep SP_SP_SYS_HOST_NAME=atlas.localdomainSP_COP_UPORT=2103SP_COP_TPORT=2103SP_SYS_VARDIR=/u01/app/shareplex/vardir/splexdb_864_12_2103SP_HOME=/u01/app/shareplex/splex_864_12_bin/[oracle@atlas bin]$ |
|
1
2
3
4
5
6
7
8
9
10
11
12
13
14
15
16
17
18
19
20
21
22
23
24
25
26
27
28
29
30
31
32
33
34
35
36
37
38
39
40
41
42
43
44
45
46
47
48
49
50
51
52
53
54
55
56
57
58
59
60
61
62
63
64
65
66
67
68
69
70
71
72
73
74
75
|
[oracle@atlas ~]$ cd $SP_HOME[oracle@atlas splex_864_12_bin]$ pwd/u01/app/shareplex/splex_864_12_bin[oracle@atlas splex_864_12_bin]$[oracle@atlas bin]$ ./ora_setupWelcome to the Oracle SharePlex setup process for port 2103.This process creates tables and user accounts needed to runOracle SharePlex replication.........Enter the Oracle SID for which SharePlex should be installed [SPLEXDB] :In order to create the SharePlex tables and user account, we mustconnect to the database as a DBA userEnter a DBA user for SPLEXDB : systemEnter password for the DBA account, which will not echo :connecting--This may take a few seconds.validating user name and password. . . This may take a few seconds.SharePlex objects will need to be created under a specialaccount. You can pick an existing user or create a new one.Would you like to create a new SharePlex user ? [y] :Enter username for new user [splex/splex] : splex_864_12_2103Enter password for new user :Re-enter password for new user :Warning: This user is now being granted unlimited tablespace.This privilege will remain in effect until it is explicitly changed.Granting select on sys.user$ to splex_864_12_2103Do you want to enable replication of tables with TDE? [n] :To enable replication of tables with TDE in the future, please rerun ora_setup.Setup will now install SharePlex objects.These are the existing tablespaces.SYSTEM SYSAUX UNDOTBS1 TEMP USERS EXAMPLE SHAREPLEX_DATA SHAREPLEX_INDXSHAREPLEX_TEMPEnter the default tablespace for use by SharePlex [USERS] : SHAREPLEX_DATAEnter the temporary tablespace for use by SharePlex [TEMP] : SHAREPLEX_TEMPEnter the index tablespace for use by SharePlex [ ] : SHAREPLEX_INDXCreating SharePlex objects [Installation type: Fresh]. . .Creating SharePlex Oracle-timezone-region map . . . Done.Creating Conflict Resolution Package . . . Done.Creating SharePlex Dataequator package . . .Loading Compare Package from "/u01/app/shareplex/splex_864_12_bin/util/sp_deq_pkg.plb"...Done.Loading Compare Varray Package from "/u01/app/shareplex/splex_864_12_bin/util/sp_deq_v_pkg.plb"...Done.Will the current setup for sid: [SPLEXDB] be used as source (including cases as source for failover or master-master setups)? [y] :Setup of SharePlex objects successful . . .Changing SharePlex connection database . . .Setup completed successfully[oracle@atlas bin]$ |
Run also ora_setup on the target. We only show variables on target
|
1
2
3
4
5
6
|
[oracle@atlasrep ~]$ env | grep SP_SP_SYS_HOST_NAME=atlasrep.localdomainSP_COP_UPORT=2103SP_COP_TPORT=2103SP_SYS_VARDIR=/u01/app/shareplex/vardir/splexstr1_864_11_2103SP_HOME=/u01/app/shareplex/splex_864_11_bin/ |
5- Starting SharePlex processes on both source and target
Now we are ready to start SharePlex processes. The $SP_HOME/bin/sp_cop executable is used. Just remark the option –u followed by a naming variable. Not mandatory but can help for alerting setup or for locating our processes.
Starting on the source side
|
1
2
3
4
5
6
7
8
9
10
11
12
13
14
15
|
[oracle@atlas ~]$ echo $NAME_FOR_ALERTINGATLAS_SPLEXDB_TO_ATLASREP_2103[oracle@atlas ~]$ $SP_HOME/bin/sp_cop -u $NAME_FOR_ALERTING &[1] 22174[oracle@atlas ~]$******************************************************** SharePlex for Oracle Startup* Copyright 2016 Dell, Inc.* ALL RIGHTS RESERVED.* Protected by U.S. Patents: 7,461,103 and 7,065,538* Version: 8.6.4.66-m64-oracle120* VarDir : /u01/app/shareplex/vardir/splexdb_864_12_2103* Port : 2103******************************************************* |
|
1
2
3
|
[oracle@atlas ~]$ ps -ef | grep sp_coporacle 22174 3983 0 15:37 pts/2 00:00:00 /u01/app/shareplex/splex_864_12_bin/.app-modules/sp_cop -u ATLAS_SPLEXDB_TO_ATLASREP_2103 |
Starting on the target side
|
1
2
3
4
5
6
7
8
9
10
11
12
13
14
15
|
[oracle@atlasrep ~]$ echo $NAME_FOR_ALERTINGFROM_ATLAS_SPLEXDB_2103[oracle@atlasrep ~]$ $SP_HOME/bin/sp_cop -u $NAME_FOR_ALERTING &[1] 14933[oracle@atlasrep ~]$******************************************************** SharePlex for Oracle Startup* Copyright 2016 Dell, Inc.* ALL RIGHTS RESERVED.* Protected by U.S. Patents: 7,461,103 and 7,065,538* Version: 8.6.4.66-m64-oracle110* VarDir : /u01/app/shareplex/vardir/splexstr1_864_11_2103* Port : 2103******************************************************* |
|
1
2
|
[oracle@atlasrep ~]$ ps -ef | grep sp_coporacle 14933 2439 3 15:52 pts/0 00:00:00 /u01/app/shareplex/splex_864_11_bin/.app-modules/sp_cop -u FROM_ATLAS_SPLEXDB_2103 |
6- Configuring Replication
To configure data replication, we need to create a configuration file on the source. There is already a template (ORA_config) for the configuration in the $SP_SYS_VARDIR/config directory.
|
1
2
3
4
5
6
7
|
[oracle@atlas config]$ cat ORA_configdatasource:o.SOURCE_SID#source tables target tables routing mapsplex.demo_src splex.demo_dest [email protected]_sid |
We just have to create a configuration file based on this template. Below our config file
|
1
2
3
4
5
6
7
|
[oracle@atlas config]$ cat str1_config_atlasrep.cnfdatasource:o.SPLEXDB#source tables target tables routing mapexpand scott.% scott_str1.% [email protected][oracle@atlas config]$ |
When using wildcarded names in the configuration file, the keyword expand is mandatory. Without this required keyword, the wildcard characters are assumed to be part of an explicit object name, and no wildcard expansion is performed.
Once the configuration created we verify it and then activate it. Activating the configuration file will start the replication. The sp_ctrl utility is used to manage SharePlex
|
1
|
$SP_HOME/bin/sp_ctrl |
We can display the list of our configuration files
|
1
2
3
4
5
6
7
8
9
|
sp_ctrl (atlasrep:2103)> list configFile Name State Datasource-------------------------------------------------- ---------- ---------------str_config_atlas.cnf Inactive o.SPLEXSTR1Last Modified At: 13-Jun-16 16:52 Size: 159ORA_config Inactive o.SOURCE_SIDLast Modified At: 09-Jun-16 13:33 Size: 151 |
Let’s verify the configuration file syntax
|
1
2
3
4
|
sp_ctrl (atlasrep:2103)> verify config str_config_atlas.cnf Config str_config_atlas.cnf is valid View detailed config in /u01/app/shareplex/vardir/splexstr1_864_11_2103/temp/str_config_atlas.cnf |
The last step is to activate the config file
|
1
|
sp_ctrl (atlas:2103)> activate config str1_config_atlasrep.cnf |
We can validate the replication by checking the running processes with the command show.
From the Source: Capture, Read and Export processes should be running
|
1
2
3
4
5
6
7
|
sp_ctrl (atlas:2103)> showProcess Source Target State PID---------- ------------------------------------ ---------------------- -------------------- ------Capture o.SPLEXDB Running 24650Read o.SPLEXDB Running 24656Export atlas atlasrep Running 24671 |
From the Target : Import and Post processes should be running
|
1
2
3
4
5
6
|
sp_ctrl (atlasrep:2103)> showProcess Source Target State PID---------- ------------------------------------ ---------------------- -------------------- ------Import atlas atlasrep Running 16143Post o.SPLEXDB-atlas o.SPLEXSTR1 Running 16144 |
Now we can see that if we insert new rows in the source, they are replicated in the target
|
1
2
3
4
5
6
7
8
9
10
11
12
13
14
15
16
17
18
19
20
|
SQL> show parameter instance_nameNAME TYPE VALUE------------------------------------ ----------- ------------------------------instance_name string SPLEXDBSQL> conn scott/tigerConnected.SQL> insert into dept values (60,'IT','GENEVA');1 row created.SQL> insert into dept values (70,'SECURITY','DAKAR');1 row created.SQL> commit;Commit complete.SQL> |
|
1
2
3
4
5
6
7
8
9
10
11
12
13
14
15
16
17
18
19
|
SQL> show parameter instance_nameNAME TYPE VALUE------------------------------------ ----------- ------------------------------instance_name string SPLEXSTR1SQL> conn scott_str1/tigerConnected.SQL> select * from dept; DEPTNO DNAME LOC---------- -------------- ------------- 10 ACCOUNTING NEW YORK 20 RESEARCH DALLAS 30 SALES CHICAGO 40 OPERATIONS BOSTON 60 IT GENEVA 70 SECURITY DAKAR6 rows selected. |
Conclusion :
In this article we shown how easy it is to setup data replication with SharePlex.
Ref: Dell Official documentation
![Thumbnail [60x60]](https://www.dbi-services.com/blog/wp-content/uploads/2022/12/oracle-square.png)
![Thumbnail [90x90]](https://www.dbi-services.com/blog/wp-content/uploads/2022/08/DWE_web-min-scaled.jpg)