Mit Puppet die Linux-Server verwalten
Sind mehrere Linux-Server vorhanden, dann entsteht sofort ein Aufwand die unzähligen Konfigurationen ( ntp, chrony, dns, users, groups, services etc.) zu administrieren.
Jeder Administrator möchte möglichst alle Server auf die gleiche Weise konfiguriert haben, die gleichen Konfigurationen.
Puppet ist ein Werkzeug um genau diese Tätigkeiten zu automatisieren. Das erfolgt mit Manifesten (Definitionen). Die Funktionalität ist vergleichbar mit Policys in der Windowswelt.
Diese Manifeste beschreiben den soll Zustand des Systems, Files oder Service. Mit anderen Worten, fehlt eine Service wird er installiert. Wird eine Konfigurationsdatei benötigt, wird sie durch eine saubere Kopie ersetzt oder erstellt.
Dabei ist Puppet in der Lage, auf dem Zielsystem zu unterscheiden mit welchen Befehlen z.B. Software Packages installiert werden müssen, auf Red Hat Servern kennt es yum und auf Debian apt-get. Im Unterschied zu Scripts ist Puppet in der Lage auf eine beschreibende Art den soll Zustand festzulegen.
Um mit Puppet zu starten, wird ein Puppet Master benötigt und ein Client.
Die Installation des Puppet Master ist beschrieben unter folgendem Link: https://docs.puppetlabs.com/guides/install_puppet/post_install.html#configure-a-puppet-master-server
Auf dem Client muss der Puppet-Agent installiert werden.
Installation des Puppet Clients ab dem Puppet Master:
[root@fed22v1 ~]# curl -k https://puppetmaster:8140/packages/current/install.bash | bash
Installation direkt aus dem Repository der Distribution (z.B. Fedora):
[root@fed22v1 ~]# dnf info puppet
Last metadata expiration check performed 0:18:20 ago on Thu Oct 29 16:32:43 2015.
Installed Packages
Name        : puppet
Arch        : noarch
Epoch       : 0
Version     : 4.1.0
Release     : 5.fc22
Size        : 4.2 M
Repo        : @System
From repo   : updates
Summary     : A network tool for managing many disparate systems
URL         : http://puppetlabs.com
License     : ASL 2.0
Description : Puppet lets you centrally manage every important aspect of your system using a
            : cross-platform specification language that manages all the separate elements
            : normally aggregated in different files, like users, cron jobs, and hosts,
            : along with obviously discrete elements like packages, services, and files.
Nach der Installation des Clients, muss im /etc/puppet/puppet.conf folgendes eingetragen werden (puppetmaster muss aufgelöst werden können):
[main]
server = puppetmaster
[agent]
certname = fed22v1.localdomain
Auf dem Puppet Master muss noch der Client akzeptiert werden:
[root@puppetmaster]# puppet cert sign fed22v1.localdomain
Erster Kontakt zwischen Client und Puppet Master kann mit dem Befehl sofort ausgelöst werden:
[root@fed22v1 ~]# puppet agent –tv
Und jetzt den ersten Dienst konfigurieren:
Unter den Puppet Anwendern, werden eine ganze Liste von vordefinierten Konfigurationen zur Verfügung gestellt.
[root@puppetmaster /etc/puppetlabs/code/environments/production/modules]# puppet module search ntp
Notice: Searching https://forgeapi.puppetlabs.com ...
NAME                      DESCRIPTION                                                           AUTHOR             KEYWORDS
thias-ntp                 Network Time Protocol module                                          @thias             ntp ntpd
ghoneycutt-ntp            Manage NTP                                                            @ghoneycutt        ntp time services sync
puppetlabs-ntp            Installs, configures, and manages the NTP service.                    @puppetlabs        ntp time rhel ntpd gentoo aix
dhoppe-ntp                This module installs, configures and manages the NTP service.         @dhoppe            debian ubuntu ntp
diskstats-ntp             Lean RedHat NTP module, with the most common settings.                @diskstats         redhat ntp time rhel ntpd hiera
saz-ntp                   UNKNOWN                                                               @saz               ntp time ntpd gentoo oel suse
example42-ntp             Puppet module for ntp                                                 @example42         ntp example42
erwbgy-ntp                configure and manage ntpd                                             @erwbgy            ntp time services rhel centos
mthibaut-ntp              NTP Module                                                            @mthibaut          ntp hiera
kickstandproject-ntp      UNKNOWN                                                               @kickstandproject  ntp
aageyev-ntp               Install ntp on ubuntu                                                 @aageyev           ubuntu ntp
a2tar-ntp                 Install ntp on ubuntu                                                 @a2tar             ubuntu ntp
csail-ntp                 Configures NTP servers and clients                                    @csail             debian ubuntu ntp ntpd freebsd
warriornew-ntp            ntp setup                                                             @warriornew        ntp
a2labs-ntp                Install ntp on ubuntu                                                 @a2labs
mmitchell-puppetlabs_ntp  UNKNOWN                                                               @mmitchell
tohuwabohu-openntp        Puppet module for OpenNTPD                                            @tohuwabohu        ntp time openntp
hacking-ntpclient         A module to enable easy configuration of an NTP client                @hacking           ntp
ringingliberty-chrony     Manages the chrony network time daemon                                @ringingliberty    debian ubuntu redhat ntp fedora
example42-openntpd        Puppet module for openntpd                                            @example42         ntp example42 openntpd
evenup-time               Manages the timezone and ntp.                                         @evenup            ntp
oppegaard-ntpd            OpenNTP module for OpenBSD                                            @oppegaard         ntp ntpd openbsd openntpd
erwbgy-system             Manage Linux system resources and services from hiera configuration   @erwbgy            ntp rhel cron sshd user host fact
mikegleasonjr-server      The Server module serves as a base configuration for all your mana... @mikegleasonjr     ntp rsyslog firewall timezone swa
[root@puppetmaster /etc/puppetlabs/code/environments/production/modules]# puppet module search chrony
Notice: Searching https://forgeapi.puppetlabs.com ...
NAME                   DESCRIPTION                                               AUTHOR           KEYWORDS
ringingliberty-chrony  Manages the chrony network time daemon                    @ringingliberty redhat ntp fedora centos chrony
aboe-chrony            Module to install chrony time daemon on Archlinux         @aboe
Als erstes Beispiel habe ich ntp und chrony gewählt.
Auf dem Pupper Master, muss das entsprechende Modul installiert werden:
[root@puppetmaster]# puppet module install puppetlabs-ntp
[root@puppetmaster]# puppet module install ringingliberty-chrony
Nach der Installation liegen die Module unter:
[root@puppetmaster /etc/puppetlabs/code/environments/production/modules]# ls -als
4 drwxr-xr-x 6 root root 4096 Oct 29 12:12 chrony
4 drwxr-xr-x 7 root root 4096 Jul 22 00:44 ntp
Das Modul muss noch einem Client zugeteilt werden(CLI):
Diese Zuteilung erfolgt unter (site.pp):
[root@puppetmaster /etc/puppetlabs/code/environments/production/manifests]# ls -als
4 -rw-r--r-- 1 root root 2079 Oct 29 12:38 site.pp
node 'fed22v1.localdomain' {
class { 'ntp':
servers => [
'1.ch.pool.ntp.org',
'2.ch.pool.ntp.org',
'3.ch.pool.ntp.org'
]}}

oder
node 'fed22v1.localdomain' {
class { 'chrony':
servers => [
'1.ch.pool.ntp.org',
'2.ch.pool.ntp.org',
'3.ch.pool.ntp.org'
]}}
Das Modul muss noch einem Client zugeteilt werden(Web Zugang):
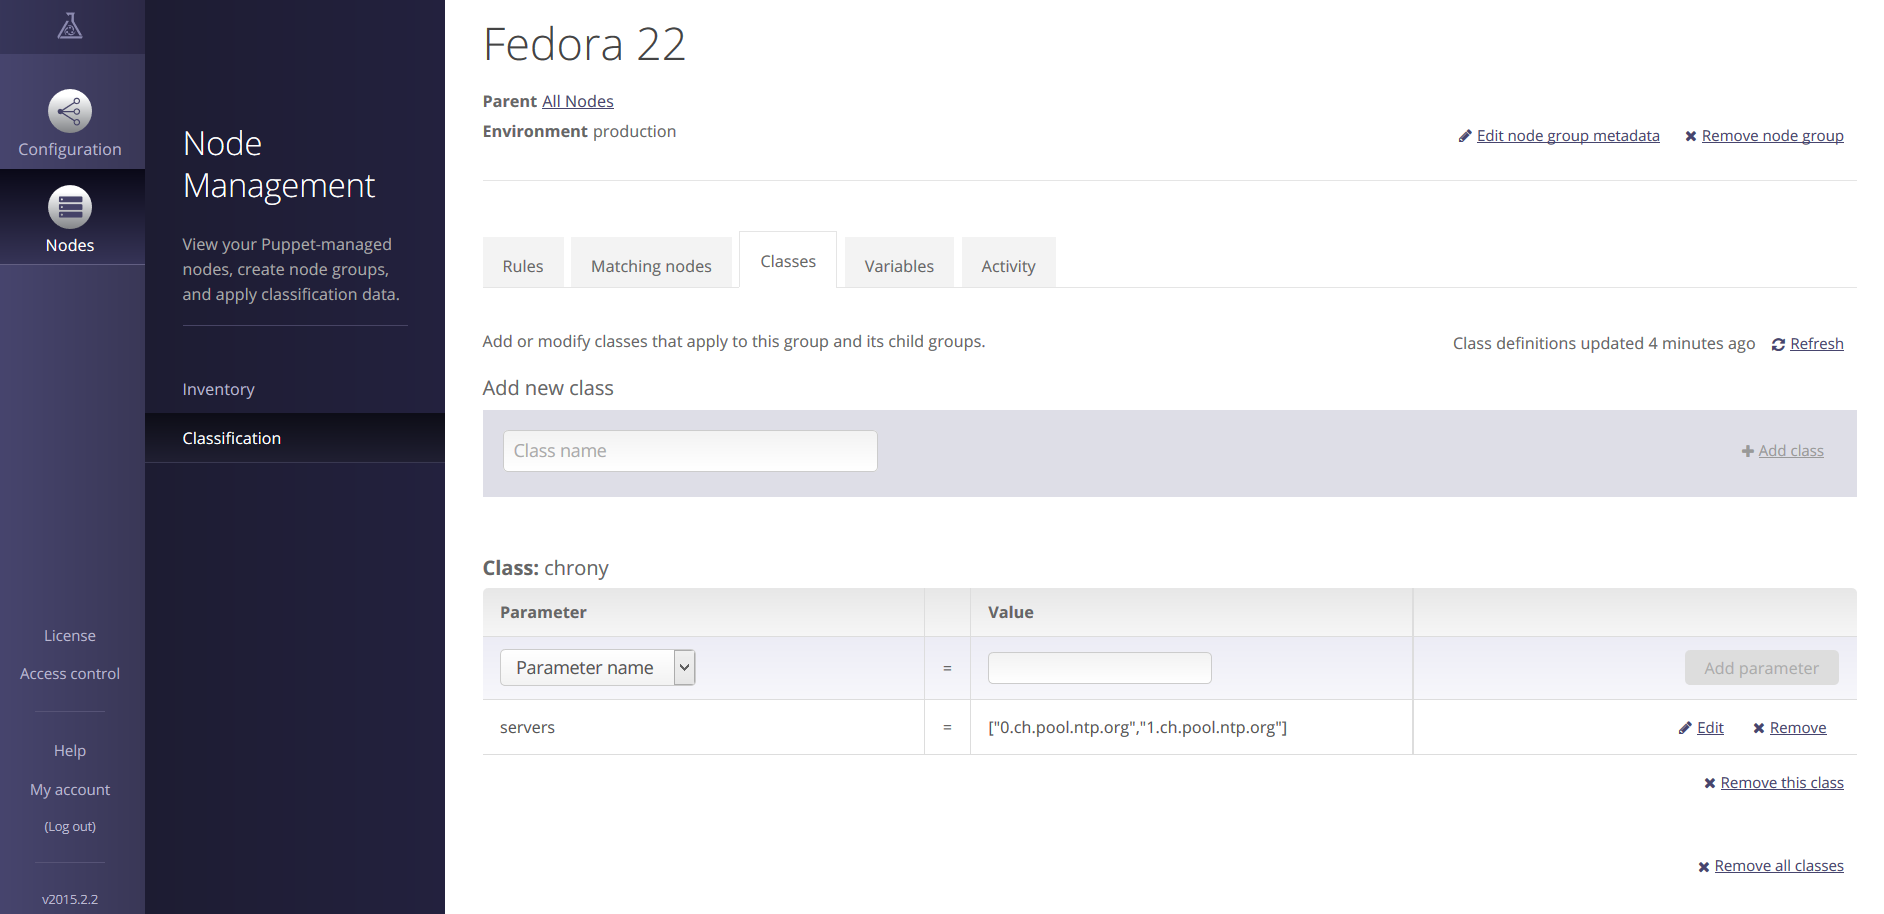
Der Unterschied dieser beiden Arten der Konfiguration:
- pp
Das wird als erstes durchgearbeitet, eine Zentrale Möglichkeit der Konfiguration. Hier können auch Standards für alle Clients festgelegt werden.
- Web-Gui
Hier könne Server in Gruppen zusammenfassen werden. Diesen Gruppen werden dann die Classen(z.B. chrony) zugeteilt.
Fazit:
Puppet biete die möglich Server zentral zu konfigurieren. Einfache Punkte wie Zeitsynchronisation sind dabei schnell konfiguriert und installiert. Als nächstes werde ich mich an User, Services und Konfigurationsfiles wagen und so die weiteren mächtigen Möglichkeiten von Puppet erkunden!
![Thumbnail [60x60]](https://www.dbi-services.com/blog/wp-content/uploads/2022/12/oracle-square.png)
![Thumbnail [90x90]](https://www.dbi-services.com/blog/wp-content/uploads/2022/08/DWE_web-min-scaled.jpg)
![Thumbnail [90x90]](https://www.dbi-services.com/blog/wp-content/uploads/2023/05/STM_web_min.jpg)
![Thumbnail [90x90]](https://www.dbi-services.com/blog/wp-content/uploads/2022/08/JDU_web-min-scaled.jpg)