By Mouhamadou Diaw
Dbvisit Standby can also be installed on Oracle Database Appliance (ODA). The installation is the same that on any other Linux box. I did an install of Dbvist 10 on an ODA 19.12 for a customer and in this blog I am describing the on an ODA steps.
The configuration is below
-The primary server is oda-prod-01
-The standby server is oda-dev-01
-The database name is ORCL
Dbvisit should be installed on both servers (primary and standby). Below I describe the installation on the primary server but you will do the same steps on the standby
We first unpack the downloaded software.
|
1
2
3
4
5
6
7
8
9
10
11
12
13
14
15
16
17
|
[oracle@oda-prod-01 software]$ unzip dbvisit-standby10.1.0-linux.zipArchive: dbvisit-standby10.1.0-linux.zip inflating: dbvisit-standby10.1.0.tar[oracle@oda-prod-01 software]$ tar xvf dbvisit-standby10.1.0.tar./dbvisit/./dbvisit/dbvnet/./dbvisit/dbvnet/conf/./dbvisit/dbvnet/conf/dbvnetd.conf……./dbvisit/standby/conf/dbv_error.html./dbvisit/observer/doc/./dbvisit/observer/log/./dbvisit/observer/observersvc./README.txt./INSTALL.txt[oracle@oda-prod-01 software]$ |
We create the installation location and give the ownership to oracle
|
1
2
3
|
[root@oda-prod-01 ~]# mkdir -p /u01/app/dbvisit[root@oda-prod-01 ~]# chown -R oracle:oinstall /u01/app/dbvisit[root@oda-prod-01 ~]# |
For the installation go the installer folder and run the install_dbvisit executable and to fill required info
Install Core Components
|
1
2
3
4
5
6
7
8
9
10
11
12
13
14
15
16
17
18
19
20
21
22
23
24
25
26
27
28
29
30
31
32
33
34
35
36
37
38
39
40
41
42
43
44
45
46
47
48
49
50
51
52
53
54
55
56
57
58
59
60
61
62
63
64
65
66
67
68
69
70
71
72
73
74
75
76
77
78
79
80
81
82
83
84
85
86
87
88
89
90
91
92
93
94
95
96
97
98
99
100
101
102
103
104
105
106
107
108
109
110
111
112
113
114
115
116
117
118
119
120
121
122
123
124
125
126
127
128
129
130
131
132
133
134
135
136
137
138
139
140
141
142
143
144
145
146
147
148
149
150
151
152
153
154
155
156
157
158
159
160
161
162
163
164
165
166
167
168
169
170
171
172
173
174
175
176
177
178
179
180
181
182
183
184
185
186
187
188
189
190
191
192
193
194
195
196
197
198
199
200
201
202
203
204
205
206
207
208
209
210
211
212
213
214
215
216
217
218
219
220
221
222
223
224
225
226
227
228
229
230
231
232
233
234
|
[oracle@oda-prod-01 installer]$ ./install-dbvisit----------------------------------------------------------- Welcome to the Dbvisit software installer.----------------------------------------------------------- It is recommended to make a backup of our current Dbvisit software location (Dbvisit Base location) for rollback purposes. Installer Directory /u01/app/oracle/software/dbvisit>>> Please specify the Dbvisit installation directory (Dbvisit Base). The various Dbvisit products and components - such as Dbvisit Standby, Dbvisit Dbvnet will be installed in the appropriate subdirectories of this path. Enter a custom value or press ENTER to accept default [/usr/dbvisit]: > /u01/app/dbvisit DBVISIT_BASE = /u01/app/dbvisit ----------------------------------------------------------- Component Installer Version Installed Version ----------------------------------------------------------- standby 10.1.0_0_gba3a9e08 not installed dbvnet 10.1.0_0_gba3a9e08 (dbvnet v1.5.0-317-gbd2ce3f) not installed dbvagent 10.1.0_0_gba3a9e08 not installed dbvserver 10.1.0_0_gba3a9e08 not installed observer 10.1.0_0_gba3a9e08 not installed ----------------------------------------------------------- What action would you like to perform? 1 - Install component(s) 2 - Uninstall component(s) 3 - Exit Your choice: 1 Choose component(s): 1 - Core Components (Dbvisit Standby Cli, Dbvnet, Dbvagent) 2 - Dbvisit Standby Core (Command Line Interface) 3 - Dbvnet (Dbvisit Network Communication) 4 - Dbvagent (Dbvisit Agent) 5 - Dbvserver (Dbvisit Central Console) - Not available on Solaris/AIX 6 - Dbvisit Observer (Automatic Failover Option) - Not available on Solaris/AIX Press ENTER to exit Installer Your choice: 1>>> Please specify the Oracle Instant Client version. The Oracle Instant Client is a required library for Dbvisit products. You may choose 12.1 or 12.2, however the default version is 12.2. Enter a custom value or press ENTER to accept default [12.2]: >----------------------------------------------------------- Summary of the Dbvisit STANDBY configuration----------------------------------------------------------- DBVISIT_BASE /u01/app/dbvisit INSTANT_CLIENT_VERSION 12.2 Press ENTER to continue----------------------------------------------------------- About to configure DBVISIT DBVNET----------------------------------------------------------->>> Please specify the Local host name to be used by Dbvnet on this server. Dbvnet will be listening on the local IP Address on this server which resolve to the host name specified here. If using a cluster or virtual IP make sure the host name or alias specified here resolve to the IP address local to where dbvnet is installed. The host name should resolve to IPv4 address, if not you can use an IPv4 IP address instead of host name. Enter a custom value or press ENTER to accept default [oda-prod-01]: >>>> Please specify the Local Dbvnet PORT to be used. Dbvnet will be listening on the specified port for incoming connections from remote dbvnet connections. Please make sure that this port is not already in use or blocked by any firewall. You may choose any value between 1024 and 65535, however the default of 7890 is recommended. Enter a custom value or press ENTER to accept default [7890]: >>>> Please specify the Dbvnet Passphrase to be used for secure connections. The passphrase provided must be the same in both the local and remote Dbvnet installations. It is used to establish a secure (encrypted) Dbvnet connections Enter a custom value: > ******----------------------------------------------------------- Summary of the Dbvisit DBVNET configuration----------------------------------------------------------- DBVISIT_BASE /u01/app/dbvisit DBVNET_LOCAL_HOST oda-prod-01 DBVNET_LOCAL_PORT 7890 DBVNET_PASSPHRASE **** Press ENTER to continue----------------------------------------------------------- About to configure DBVISIT DBVAGENT----------------------------------------------------------->>> Please specify the IPv4 address or host name to be used for the Dbvisit Agent. The Dbvisit Agent (Dbvagent) will be listening on this local address. Connections from Dbvserver (GUI) will be established to this Dbvagent, thus the address must be visible from the Dbvserver location. If using a cluster or virtual IP, make sure the host name or alias specified here resolves to the IP address local to where the Dbvagent is installed. The host name should resolve to an IPv4 address, otherwise you can use an IPv4 IP address instead of a host name. Enter a custom value or press ENTER to accept default [oda-prod-01]: >>>> Please specify the listening PORT number for Dbvagent. The Dbvisit Agent (Dbvagent) will be listening on the specified port for incoming requests from Dbvserver (GUI). Please make sure that this port is not already in use, and is not blocked by any firewall. You may choose any value between 1024 and 65535, however the default of 7891 is recommended. Enter a custom value or press ENTER to accept default [7891]: >>>> Please specify the passphrase for Dbvagent Each Dbvisit Agent must have a passphrase specified. Think of this passphrase as the password for Dbvserver (GUI) to access each Dbvagent securely. The passphrase can be unique to each Dbvagent. It will be used to establish a secure connection between Dbvserver and the Dbvisit Agent. Enter a custom value: > ****>>> Please specify the IPv4 address or host name to be used for the Dbvserver Return Address (OPTIONAL) This is an advanced, and OPTIONAL parameter. If unsure, please accept the default value, which is blank. If necessary, you can use this parameter to specify a fixed IPv4 address for the Dbvisit Dbvserver (GUI). In the overwhelming majority of cases, our software will handle this for you automatically, and setting this parameter should NOT be necessary. If, however, your Dbvserver's externally-visible address differs from the locally-resolved address, you can specify it here. The most common scenario where this can happen is if you have address forwarding set up on a cloud-deployed environment. If set, Dbvagent will use this address instead of any other to connect to Dbvserver. Enter a custom value or press ENTER to accept default [ ]: >>>> Please specify the port number to be used as the Dbvserver Return Port (OPTIONAL) This is an advanced, and OPTIONAL parameter. This is the port value to match the OPTIONAL Dbvserver Return Address parameter immediately above. If unsure, please accept the default value, which is blank. Enter a custom value or press ENTER to accept default [ ]: >----------------------------------------------------------- Summary of the Dbvisit DBVAGENT configuration----------------------------------------------------------- DBVISIT_BASE /u01/app/dbvisit DBVAGENT_LOCAL_HOST oda-prod-01 DBVAGENT_LOCAL_PORT 7891 DBVAGENT_PASSPHRASE ****** DBVAGENT_WEBSERVER_HOST DBVAGENT_WEBSERVER_PORT Press ENTER to continue----------------------------------------------------------- About to install Dbvisit STANDBY----------------------------------------------------------- NTF repo installed. Component standby installed.----------------------------------------------------------- About to install Dbvisit DBVNET----------------------------------------------------------- Component dbvnet installed.----------------------------------------------------------- About to install Dbvisit DBVAGENT----------------------------------------------------------- Component dbvagent installed. ----------------------------------------------------------- Component Installer Version Installed Version ----------------------------------------------------------- standby 10.1.0_0_gba3a9e08 10.1.0_0_gba3a9e08 dbvnet 10.1.0_0_gba3a9e08 (dbvnet v1.5.0-317-gbd2ce3f) 10.1.0_0_gba3a9e08 (dbvnet v1.5.0-317-gbd2ce3f) dbvagent 10.1.0_0_gba3a9e08 10.1.0_0_gba3a9e08 dbvserver 10.1.0_0_gba3a9e08 not installed observer 10.1.0_0_gba3a9e08 not installed ----------------------------------------------------------- What action would you like to perform? 1 - Install component(s) 2 - Uninstall component(s) 3 - Exit Your choice:3>>> Installation completed Install log /tmp/dbvisit_install.log.202110190853.[oracle@oda-prod-01 installer]$ |
Once installation done without errors, we can start the daemons
-dbvagent
-dbvnet
|
1
2
3
4
5
6
7
8
9
|
[oracle@oda-prod-01 installer]$ /u01/app/dbvisit/dbvagent/dbvagent -d startDbvagent daemon started.[oracle@oda-prod-01 installer]$ /u01/app/dbvisit/dbvnet/dbvnet -d startDbvnet daemon started with pid 97674.[oracle@oda-prod-01 installer]$ ps -ef|grep dbvagent|grep -v greporacle 97206 1 0 09:05 ? 00:00:00 /u01/app/dbvisit/dbvagent/dbvagent -d start[oracle@oda-prod-01 installer]$ ps -ef|grep dbvnet|grep -v greporacle 97674 1 0 09:05 ? 00:00:00 /u01/app/dbvisit/dbvnet/dbvnet -d start[oracle@oda-prod-01 installer]$ |
Repeat the same install on the standby server.
Install dbserver
Dbvisit comes with a central console GUI which is called dbvserver console. This console can be installed on a standalone server. In our case we install it on the primary server. Just on the installer directory, launch the install-dbvisit file
|
1
2
3
4
5
6
7
8
9
10
11
12
13
14
15
16
17
18
19
20
21
22
23
24
25
26
27
28
29
30
31
32
33
34
35
36
37
38
39
40
41
42
43
44
45
46
47
48
49
50
51
52
53
54
55
56
57
58
59
60
61
62
63
64
65
66
67
68
69
70
71
72
73
74
75
76
77
78
79
80
81
82
83
84
85
86
87
88
89
90
91
92
93
94
95
96
97
98
99
100
101
102
103
104
105
106
107
108
109
110
111
112
113
114
115
116
117
118
119
120
121
122
123
124
125
126
127
128
129
130
131
132
133
134
135
136
137
138
139
140
141
142
143
144
145
146
147
|
oracle@oda-prod-01:/u01/app/oracle/software/dbvisit/installer/ [ORCL] ./install-dbvisit----------------------------------------------------------- Welcome to the Dbvisit software installer.----------------------------------------------------------- It is recommended to make a backup of our current Dbvisit software location (Dbvisit Base location) for rollback purposes. Installer Directory /u01/app/oracle/software/dbvisit>>> Please specify the Dbvisit installation directory (Dbvisit Base). The various Dbvisit products and components - such as Dbvisit Standby, Dbvisit Dbvnet will be installed in the appropriate subdirectories of this path. Enter a custom value or press ENTER to accept default [/usr/dbvisit]: > /u01/app/dbvisit DBVISIT_BASE = /u01/app/dbvisit ----------------------------------------------------------- Component Installer Version Installed Version ----------------------------------------------------------- standby 10.1.0_0_gba3a9e08 10.1.0_0_gba3a9e08 dbvnet 10.1.0_0_gba3a9e08 (dbvnet v1.5.0-317-gbd2ce3f) 10.1.0_0_gba3a9e08 (dbvnet v1.5.0-317-gbd2ce3f) dbvagent 10.1.0_0_gba3a9e08 10.1.0_0_gba3a9e08 dbvserver 10.1.0_0_gba3a9e08 not installed observer 10.1.0_0_gba3a9e08 not installed ----------------------------------------------------------- What action would you like to perform? 1 - Install component(s) 2 - Uninstall component(s) 3 - Exit Your choice: 1 Choose component(s): 1 - Core Components (Dbvisit Standby Cli, Dbvnet, Dbvagent) 2 - Dbvisit Standby Core (Command Line Interface) 3 - Dbvnet (Dbvisit Network Communication) 4 - Dbvagent (Dbvisit Agent) 5 - Dbvserver (Dbvisit Central Console) - Not available on Solaris/AIX 6 - Dbvisit Observer (Automatic Failover Option) - Not available on Solaris/AIX Press ENTER to exit Installer Your choice: 5----------------------------------------------------------- About to configure DBVISIT DBVSERVER----------------------------------------------------------->>> Please specify the IPv4 address to be used for Dbvserver The Dbvisit Web Server (Dbvserver) will be listening on this local address. If using a cluster or virtual IP, make sure that the host name or alias specified here resolve to the IP address local to where Dbvserver is installed. It is recommended that you set this parameter to an IP address, as opposed to a host name. If you are unsure about the remote host name during installation, use the default value, which will be the current local hostname. Enter a custom value or press ENTER to accept default [oda-prod-01]: >>>> Please specify the listening port number for Dbvserver on the local server You may choose any value between 1024 and 65535. The default recommended value is 4433. Note: if you can not access this port after the installation has finished, then please double-check your server firewall settings to ensure the selected port is open. Enter a custom value or press ENTER to accept default [4433]: >>>> Please specify the IPv4 address to be used for the Dbvserver public interface The public interface address will be used by Dbvagents for sending back information, e.g. Task progress. This should be set to the externally-visible IP address of the local host. Enter a custom value or press ENTER to accept default [oda-prod-01]: >>>> Please specify a publicly-available port number for Dbvserver. Like the Public Address setting previously, this port should be remotely accessible, and can potentially be different from the Dbvserver Listening Port, especially if your server is behind a DMZ. If you are unsure of the correct value for this parameter, it is usually fine to leave it the same as the Listener Port setting. You may choose any value between 1024 and 65535. The default recommended value is 4433. Note: if you can not access this port after the installation has finished, then please double-check your server firewall settings to ensure the selected port is open. Enter a custom value or press ENTER to accept default [4433]: >----------------------------------------------------------- Summary of the Dbvisit DBVSERVER configuration----------------------------------------------------------- DBVISIT_BASE /u01/app/dbvisit DBVSERVER_LOCAL_HOST oda-prod-01 DBVSERVER_LOCAL_PORT 4433 DBVSERVER_PUBLIC_HOST oda-prod-01 DBVSERVER_PUBLIC_PORT 4433 Press ENTER to continue----------------------------------------------------------- About to install Dbvisit DBVSERVER----------------------------------------------------------- Component dbvserver installed. ----------------------------------------------------------- Component Installer Version Installed Version ----------------------------------------------------------- standby 10.1.0_0_gba3a9e08 10.1.0_0_gba3a9e08 dbvnet 10.1.0_0_gba3a9e08 (dbvnet v1.5.0-317-gbd2ce3f) 10.1.0_0_gba3a9e08 (dbvnet v1.5.0-317-gbd2ce3f) dbvagent 10.1.0_0_gba3a9e08 10.1.0_0_gba3a9e08 dbvserver 10.1.0_0_gba3a9e08 10.1.0_0_gba3a9e08 observer 10.1.0_0_gba3a9e08 not installed ----------------------------------------------------------- What action would you like to perform? 1 - Install component(s) 2 - Uninstall component(s) 3 - Exit Your choice: 3>>> Installation completed Install log /tmp/dbvisit_install.log.202110260855.oracle@oda-prod-01:/u01/app/oracle/software/dbvisit/installer/ [ORCL] |
Once installed the dbserver daemon can be starded
|
1
|
oracle@oda-prod-01:/u01/app/oracle [ORCL] /u01/app/dbvisit/dbvserver/dbvserver -d start |
To connect to the dbserver console go to the following URL https://oda-prod-01:4433/. You can log in with the following credentials
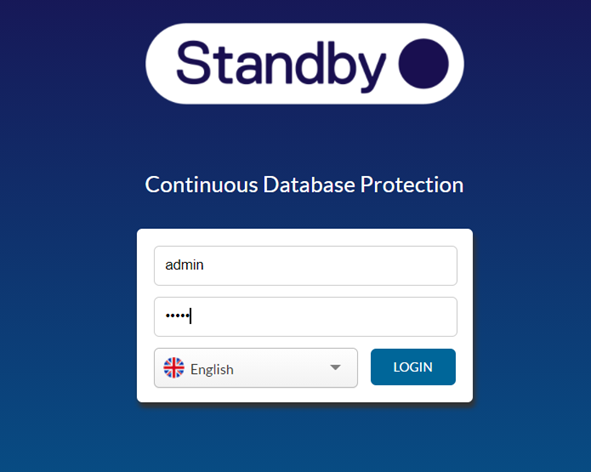
login : admin
password : admin –you should change your password
Standby Creation
For the standby creation, we first test the network between the two servers.
|
1
2
3
4
5
6
7
8
9
10
11
12
13
14
15
16
17
18
19
20
21
22
23
24
25
26
27
28
29
30
31
32
33
34
35
36
37
38
39
40
41
42
43
44
45
46
47
48
49
50
51
52
53
54
55
56
57
|
[oracle@oda-prod-01 dbvisit]$ /u01/app/dbvisit/standby/dbvctl -f system_readinessPlease supply the following information to complete the test.Default values are in [].Enter Dbvisit Standby location on local server: [/u01/app/dbvisit]:Your input: /u01/app/dbvisitIs this correct? [Yes]:Enter the name of the remote server: []: oda-dev-01Your input: oda-dev-01Is this correct? [Yes]:Enter Dbvisit Standby location on remote server: [/u01/app/dbvisit]:Your input: /u01/app/dbvisitIs this correct? [Yes]:Enter the name of a file to transfer relative to local install directory/u01/app/dbvisit: [standby/doc/README.txt]:Your input: standby/doc/README.txtIs this correct? [Yes]:Choose copy method:1) /u01/app/dbvisit/dbvnet/dbvnet2) /usr/bin/scpPlease enter choice [1] : 1Is this correct? [Yes]:Enter port for method /u01/app/dbvisit/dbvnet/dbvnet: [7890]:Your input: 7890Is this correct? [Yes]:-------------------------------------------------------------Testing the network connection between local server and remote server oda-dev-01.-------------------------------------------------------------Settings========Remote server =oda-dev-01Dbvisit Standby location on local server =/u01/app/dbvisitDbvisit Standby location on remote server =/u01/app/dbvisitTest file to copy =/u01/app/dbvisit/standby/doc/README.txtTransfer method =/u01/app/dbvisit/dbvnet/dbvnetport =7890-------------------------------------------------------------Checking network connection by copying file to remote server oda-dev-01...-------------------------------------------------------------Trace file /u01/app/dbvisit/standby/trace/72017_dbvctl_f_system_readiness_202110190957.trcFile copied successfully. Network connection between local and oda-dev-01correctly configured.[oracle@oda-prod-01 dbvisit]$ |
We then create the configuration file for the database ORCL
|
1
2
3
4
5
6
7
8
9
10
11
12
13
14
15
16
17
18
19
20
21
22
23
24
25
26
27
28
29
30
31
32
33
34
35
36
37
38
39
40
41
42
43
44
45
46
47
48
49
50
51
52
53
54
55
56
57
58
59
60
61
62
63
64
65
66
67
68
69
70
71
72
73
74
75
76
77
78
79
80
81
82
83
84
85
86
87
88
89
90
91
92
93
94
95
96
97
98
99
100
101
102
103
104
105
106
107
108
109
110
111
112
113
114
115
116
117
118
119
120
121
122
123
124
125
126
127
128
129
130
131
132
133
134
135
136
137
138
139
140
141
142
143
144
145
146
147
148
149
150
151
152
153
154
155
156
157
158
159
160
161
162
163
164
165
166
167
168
169
170
171
172
173
174
175
176
177
178
179
180
181
182
183
184
185
186
187
188
189
190
191
192
193
194
195
196
197
198
199
200
201
202
203
204
205
206
207
208
209
210
211
212
213
214
215
216
217
218
219
220
221
222
223
224
225
226
227
228
229
230
231
232
233
234
235
236
237
238
239
240
241
242
243
244
245
246
247
248
249
250
251
252
253
254
255
256
257
258
259
260
261
262
263
264
265
266
267
268
269
270
271
|
[oracle@oda-prod-01 ~]$ /u01/app/dbvisit/standby/dbvctl -o setup========================================================= Dbvisit Standby Database Technology (10.1.0_0_gba3a9e08)==========================================================>dbvctl only needs to be run on the primary server.Is this the primary server? [Yes]:The following Dbvisit Database configuration (DDC) file(s) found on thisserver: DDC ===1) Create New DDC2) CancelPlease enter choice [] : 1Is this correct? [Yes]: END USER LICENSE AGREEMENT PLEASE READ THIS END USER LICENSE AGREEMENT (AGREEMENT) CAREFULLY BEFORE DOWNLOADING THE LICENSED PRODUCT. BY CLICKING I AGREE BELOW, YOU ARE REPRESENTING THAT YOU HAVE THE RIGHT AND AUTHORITY TO LEGALLY BIND YOURSELF OR YOUR COMPANY, AS APPLICABLE AND YOU ARE AGREEING TO BE BOUND BY THE TERMS AND CONDITIONS OF THIS AGREEMENT, THE SUPPORT AGREEMENT AND THE IMPLEMENTATION ASSISTANCE AGREEMENT. IF YOU DO NOT AGREE TO THE TERMS OF THIS AGREEMENT, THE SUPPORT AGREEMENT OR THE IMPLEMENTATION ASSISTANCE AGREEMENT, CLICK I DO NOT AGREE AND YOU WILL NOT BE PERMITTED TO DOWNLOAD THE LICENSED PRODUCT. 1. Interpretation The following terms have the following meanings throughout this Agreement: Agreement means this end user license agreement; Authorized Users means individuals within Your organization who are authorized by you to use the Licensed Product. Error means a defect in the Licensed Product which causes the Licensed Product not to operate substantially in accordance with the specifications published in the Documentation. … … Product have no authority to alter this Agreement. Any provision found by a tribunal of competent jurisdiction to be illegal or unenforceable shall be automatically conformed to the minimum requirements of law and all other provisions shall remain in full force and effect. Waiver of any provision of this Agreement in one instance shall not preclude enforcement of it on future occasions. Headings are for reference purposes only and have no substantive effect.Continue ? [No]: yes=========================================================Dbvisit Standby setup begins.=========================================================The following Oracle instance(s) have been found on this server: SID ORACLE_HOME === ===========1) DBTEST /u01/app/odaorahome/oracle/product/19.0.0.0/dbhome_12) ORCL /u01/app/odaorahome/oracle/product/19.0.0.0/dbhome_23) ZPDP /u01/app/odaorahome/oracle/product/19.0.0.0/dbhome_14) BETA /u01/app/odaorahome/oracle/product/19.0.0.0/dbhome_15) Enter own ORACLE_SID and ORACLE_HOMEPlease enter choice [] : 2Is this correct? [Yes]:=>ORACLE_SID will be: ORCL=>ORACLE_HOME will be: /u01/app/odaorahome/oracle/product/19.0.0.0/dbhome_2------------------------------------------------------------------------------Enter the primary server name.Note: The hostname is case sensitive on UNIX based systems.=>SOURCE is [oda-prod-01]:Your input: oda-prod-01Is this correct? [Yes]:Choice is oda-prod-01------------------------------------------------------------------------------Please enter a filesystem directory that Dbvisit Standby use to store (archive)log files. This directory is not the same as the database recovery area orarchive destinations and should not be located in these areas.The ARCHSOURCE directory is located on the primary server and will become theARCHDEST location when the primary database is converted to a standby databaseduring a Graceful Switchover operation.This directory will ONLY contain (archive) log files related to this database.It should not contain any other (non archive log) files.Please ensure that this directory exists on=>ARCHSOURCE is [/u01/app/oracle/dbvisit_arch/ORCL]: /u90/dbvisit/archYour input: /u90/dbvisit/archIs this correct? [Yes]:Choice is /u90/dbvisit/arch------------------------------------------------------------------------------Do you want to use SSH to connect to the standby server? Note that if you areusing SSH, passwordless SSH authentication between the hosts must already beconfigured. By default Dbvnet will be used.=>USE_SSH is [N]:Your input: NIs this correct? [Yes]:Choice is N------------------------------------------------------------------------------Specify the DBVNET or SSH port number on the primary server. The default valuesupplied is the dbvnet port 7890. If you specified the use of SSH, pleasespecify the SSH port here.=>NETPORT is [7890]:Your input: 7890Is this correct? [Yes]:Choice is 7890------------------------------------------------------------------------------Enter the standby database hostname.If the standby database will be Oracle RAC enabled:Enter the the Virtual Hostname (linked to a Virtual IP) for standby database.This virtual hostname is attached to a VIP that will be able to move betweenthe RAC nodes. Dbvisit Standby will only run on the server where this virtualhostname (VIP) resource is running.The Virtual Hostname (and VIP) should be configured as a resouce in clusterwareand must be enabled and started on one of the nodes before yo continue with thesetup. If you are not using a Virtual Hostname (Highly Recommended), DbvisitStandby can only be configured to run on one dedicated node in the RACconfiguration - specify the hosts name here if you do not have a VirtualHostname (attached to VIP) for the cluster configured.For non-RAC configurations specify the standby database server name here.=>DESTINATION is []: oda-dev-01Your input: oda-dev-01Is this correct? [Yes]:Choice is oda-dev-01------------------------------------------------------------------------------Specify the DBVNET or SSH port number on the standby server. The default valuesupplied is the dbvnet port 7890. If you specified the use of SSH, pleasespecify the SSH port here.=>NETPORT_DR is [7890]:Your input: 7890Is this correct? [Yes]:Choice is 7890------------------------------------------------------------------------------Enter Dbvisit Standby installation directory on the standby server=>DBVISIT_BASE_DR is [/u01/app/dbvisit]:Your input: /u01/app/dbvisitIs this correct? [Yes]:Choice is /u01/app/dbvisit------------------------------------------------------------------------------Enter ORACLE_HOME directory on the standby server=>ORACLE_HOME_DR is [/u01/app/odaorahome/oracle/product/19.0.0.0/dbhome_2]:Your input: /u01/app/odaorahome/oracle/product/19.0.0.0/dbhome_2Is this correct? [Yes]:Choice is /u01/app/odaorahome/oracle/product/19.0.0.0/dbhome_2------------------------------------------------------------------------------Enter DB_UNIQUE_NAME on the standby server=>DB_UNIQUE_NAME_DR is [ORCL]:Your input: ORCLIs this correct? [Yes]:Choice is ORCL------------------------------------------------------------------------------Please enter the directory where Dbvisit Standby will transfer the (archive)log files to on standby server. This directory is not the same as thedatabase recovery area or archive destinations and should not be located inthese areas.This directory should ONLY contain (archive) log files related to thisdatabase. It should not contain any other (non archive log) files.Please ensure that this directory exists on the standby server=>ARCHDEST is [/u90/dbvisit/arch]:Your input: /u90/dbvisit/archIs this correct? [Yes]:Choice is /u90/dbvisit/arch------------------------------------------------------------------------------Enter ORACLE_SID on the standby server=>ORACLE_SID_DR is [ORCL]:Your input: ORCLIs this correct? [Yes]:Choice is ORCL------------------------------------------------------------------------------Enter ASM instance name on the standby server, if your standby is using ASM.If you are not using ASM on the standby or standby is ACFS leave the valuenull.=>ORACLE_SID_ASM_DR is []: +ASM1Your input: +ASM1Is this correct? [Yes]:Choice is +ASM1------------------------------------------------------------------------------Please specify the name of the Dbvisit Database configuration (DDC) file.The DDC file is a plain text file that contains all the Dbvisit Standbysettings.=>ENV_FILE is [ORCL]:Your input: ORCLIs this correct? [Yes]:Choice is ORCL------------------------------------------------------------------------------Provide license key.=>LICENSE_KEY is []: 4jo70-qwp4l-7gplh-g1cfr-1iclj-1aajm-ujfmkYour input: 4jo70-qwp4l-7gplh-g1cfr-1iclj-1aajm-ujfmkIs this correct? [Yes]:Choice is 4jo70-qwp4l-7gplh-g1cfr-1iclj-1aajm-ujfmk------------------------------------------------------------------------------Below are the list of configuration variables provided during the setupprocess:Configuration Variable Value Provided====================== ==============ORACLE_SID ORCLORACLE_HOME/u01/app/odaorahome/oracle/product/19.0.0.0/dbhome_2SOURCE oda-prod-01ARCHSOURCE /u90/dbvisit/archRAC_DR NUSE_SSH NNETPORT 7890DESTINATION oda-dev-01NETPORT_DR 7890DBVISIT_BASE_DR /u01/app/dbvisitORACLE_HOME_DR/u01/app/odaorahome/oracle/product/19.0.0.0/dbhome_2DB_UNIQUE_NAME_DR ORCLARCHDEST /u90/dbvisit/archORACLE_SID_DR ORCLORACLE_SID_ASM_DR +ASM1ENV_FILE ORCLLICENSE_KEY 4jo70-qwp4l-7gplh-g1cfr-1iclj-1aajm-ujfmkAre these variables correct? [Yes]:>>> Dbvisit Database configuration (DDC) file ORCL created.>>> Dbvisit Database repository (DDR) ORCL created. Repository Version 10.0 Software Version 10.0 Repository Status VALIDPID:25144TRACE:dbvisit_install.log[oracle@oda-prod-01 ~]$ |
The configuration file dbv_ORCL.env is created in this location /u01/app/dbvisit/standby/conf/
On the standby server we create an ORCL database with the same characteristics that the source one. The datafiles of the new datafile will be deleted after. Doing so will already register he standby on the cluster stack. But if needed you can register the standby database
|
1
2
|
oracle@oda-dev-01:/home/oracle/ [ORCL] srvctl add database -db ORCL -instance ORCL -oraclehome /u01/app/odaorahome/oracle/product/19.0.0.0/dbhome_2 -spfile +DATA/ORCL/PARAMETERFILE/spfile.302.1086346459 -role physical_standby -pwfile +DATA/ORCL/PASSWORD/orapwORCL -diskgroup DATA,RECO -acfspath /u01/app/odaorahome,/u01/app/odaorabase0 -dbtype SINGLE -startoption MOUNT -node oda-dev-01oracle@oda-dev-01:/home/oracle/ [ORCL] |
To create the standby, we use the RMAN duplicate command. Note that we can also let dbvisit do the duplicate. But we decide to do it manually, it’s just a classic duplicate for standby
|
1
2
3
4
5
6
7
8
9
10
11
12
13
14
15
16
17
18
19
20
21
22
23
24
|
RMAN> connect target sys/****@ORCL_prodconnected to target database: ORCL (DBID=771938447)RMAN> connect auxiliary sys/****@ORCL_devconnected to auxiliary database: ORCL (not mounted)RMAN> duplicate target database for standby from active database nofilenamecheck ;Starting Duplicate Db at 19-OCT-2021 13:10:28using target database control file instead of recovery catalogallocated channel: ORA_AUX_DISK_1channel ORA_AUX_DISK_1: SID=22 device type=DISK……executing command: SET NEWNAMEdatafile 5 switched to datafile copyFinished Duplicate Db at 19-OCT-2021 13:11:41RMAN> |
After the duplicate we can now use Dbvisit to send archived logs to the standby server
|
1
2
3
4
5
6
7
8
9
10
11
12
13
14
15
16
17
18
19
20
21
22
23
24
25
26
27
28
29
30
31
32
33
34
35
36
37
38
39
40
41
42
43
44
45
46
47
48
49
50
51
52
53
|
[oracle@oda-prod-01 ~]$ /u01/app/dbvisit/standby/dbvctl -d ORCL -i=============================================================Dbvisit Standby Database Technology (10.1.0_0_gba3a9e08) (pid 11624)dbvctl started on oda-prod-01: Tue Oct 19 13:41:06 2021=============================================================Dbvisit Standby log gap report for ORCL at 202110191341:-------------------------------------------------------------Description | SCN | Timestamp-------------------------------------------------------------Source 3645499 2021-10-19:13:41:08 +02:00Destination 3644317 2021-10-19:13:10:43 +02:00Standby database time lag (DAYS-HH:MI:SS): +00:30:25Report for Thread 1-------------------SOURCECurrent Sequence 29Last Archived Sequence 28Last Transferred SequenceLast Transferred TimestampDESTINATIONNext Required Recovery Sequence 28Transfer Log Gap 28Apply Log Gap 1=============================================================dbvctl ended on oda-prod-01: Tue Oct 19 13:41:13 2021=============================================================[oracle@oda-prod-01 ~]$ /u01/app/dbvisit/standby/dbvctl -d ORCL=============================================================Dbvisit Standby Database Technology (10.1.0_0_gba3a9e08) (pid 14077)dbvctl started on oda-prod-01: Tue Oct 19 13:41:23 2021=============================================================>>> Obtaining information from standby database (RUN_INSPECT=Y)... done Thread: 1 Archive log gap: 1. Transfer log gap: 28>>> Sending heartbeat message... skipped>>> First time Dbvisit Standby runs, Dbvisit Standby configuration will be copied to oda-dev-01...>>> Transferring Log file(s) from ORCL on oda-prod-01 to oda-dev-01: thread 1 sequence 28 (thread_1_seq_28.275.1086354699)... done=============================================================dbvctl ended on oda-prod-01: Tue Oct 19 13:41:38 2021=============================================================[oracle@oda-prod-01 ~]$ |
And from the standby server we can apply the archived logs
|
1
2
3
4
5
6
7
8
9
10
11
12
13
14
15
16
17
18
19
20
21
22
|
oracle@oda-dev-01:/home/oracle/ [ORCL] /u01/app/dbvisit/standby/dbvctl -d ORCL=============================================================Dbvisit Standby Database Technology (10.1.0_0_gba3a9e08) (pid 58776)dbvctl started on oda-dev-01: Tue Oct 19 13:42:30 2021=============================================================>>> Sending heartbeat message... skipped>>> Applying Log file(s) from oda-prod-01 to ORCL on oda-dev-01: thread 1 sequence 28 (1_28_1085054739.arc)... done Last applied log(s): thread 1 sequence 28 Next SCN required for recovery 3644384 generated at 2021-10-19:13:11:39 +02:00. Next required log thread 1 sequence 29=============================================================dbvctl ended on oda-dev-01: Tue Oct 19 13:42:36 2021=============================================================oracle@oda-dev-01:/home/oracle/ [ORCL] |
We can validate the synchronization using following command
|
1
2
3
4
5
6
7
8
9
10
11
12
13
14
15
16
17
18
19
20
21
22
23
24
25
26
27
28
29
30
31
32
33
34
|
[oracle@oda-prod-01 ~]$ /u01/app/dbvisit/standby/dbvctl -d ORCL -i=============================================================Dbvisit Standby Database Technology (10.1.0_0_gba3a9e08) (pid 16462)dbvctl started on oda-prod-01: Tue Oct 19 13:42:44 2021=============================================================Dbvisit Standby log gap report for ORCL at 202110191342:-------------------------------------------------------------Description | SCN | Timestamp-------------------------------------------------------------Source 3645637 2021-10-19:13:42:47 +02:00Destination 3644384 2021-10-19:13:11:39 +02:00Standby database time lag (DAYS-HH:MI:SS): +00:31:08Report for Thread 1-------------------SOURCECurrent Sequence 29Last Archived Sequence 28Last Transferred Sequence 28Last Transferred Timestamp 2021-10-19 13:41:38DESTINATIONNext Required Recovery Sequence 29Transfer Log Gap 0Apply Log Gap 0=============================================================dbvctl ended on oda-prod-01: Tue Oct 19 13:42:51 2021=============================================================[oracle@oda-prod-01 ~]$ |
For the synchronization we can for example do the following schedule via crontab
From the primary send every 10 minutes archived logs
From the standby apply every 10 minutes archived logs
But Dbvisit comes with daemons which will automatically send and apply archived logs. We just have to start these daemons on both servers.
The DAEMON is started with this command
|
1
|
[oracle@oda-prod-01 system]# /u01/app/dbvisit/standby/dbvctl -d ORCL -D start |
Using dbvserver console
Once logged in the console, follow these steps to add the configuration on the console
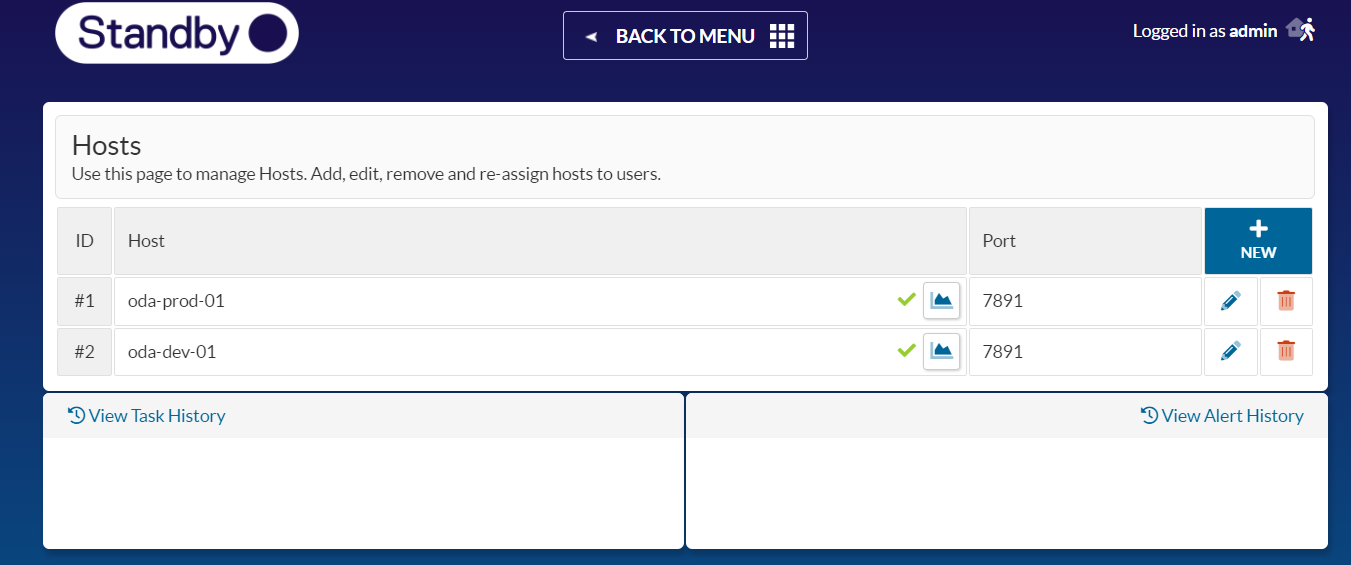
Go to MANAGE HOSTS
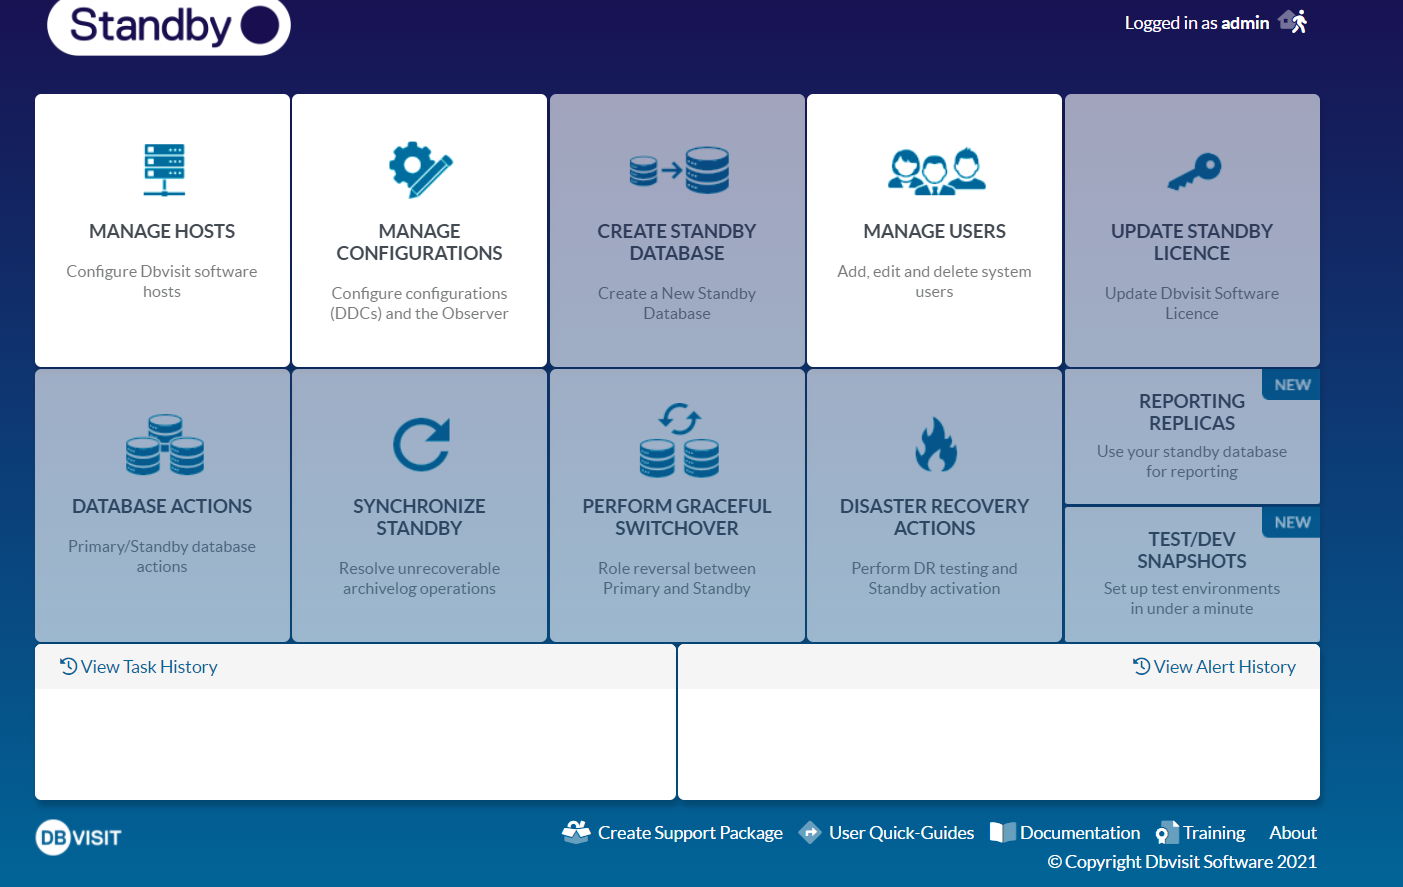
Click on CREATE NEW HOST and select your hosts
Go to MANAGE CONFIGURATIONS
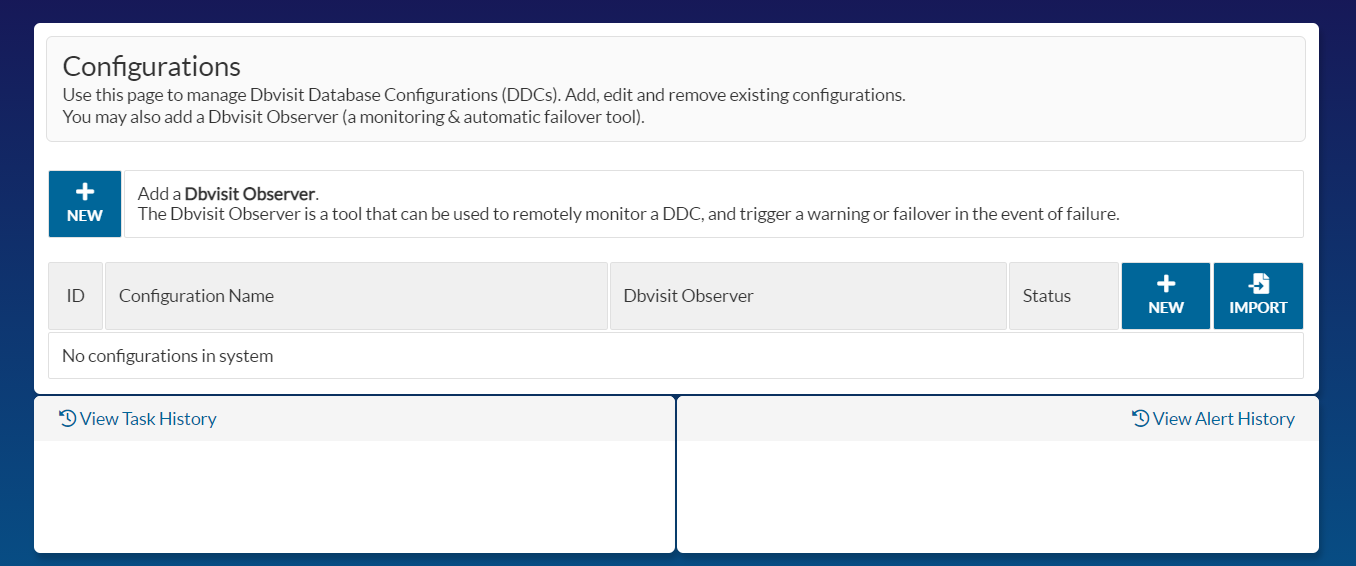
Click on IMPORT select your source host
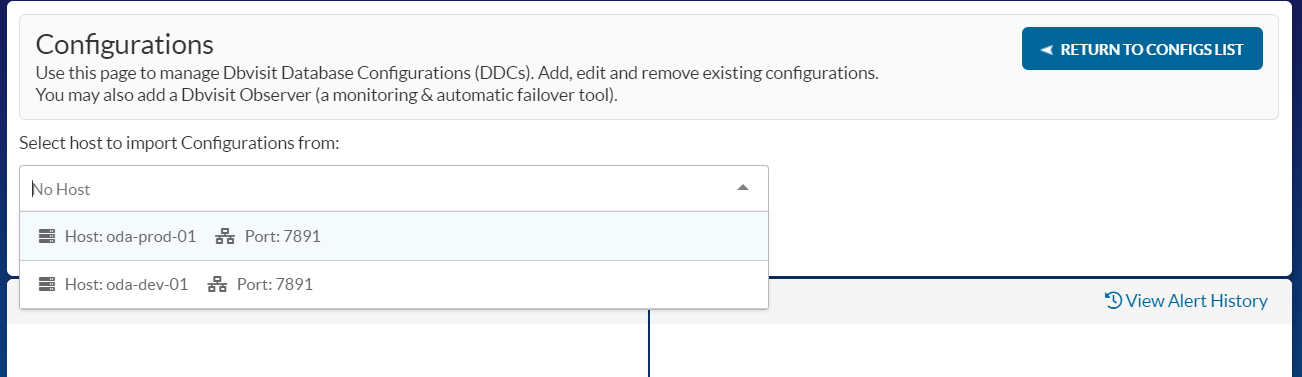
At the end at the process you should have a MENU Page like this.

Conclusion
As we can see the setup is the same than in a non-ODA environment. Instead of creating a full database on the standby side, you can just create an instance only. But as we can see you can create a complete database and then delete the datafiles. Just also for all the daemons
dbvnet, dbvagent, dbvserver, dbvctl you will propably create startup scripts om SYSTEMD if you are using Linux 7
![Thumbnail [60x60]](https://www.dbi-services.com/blog/wp-content/uploads/2022/12/oracle-square.png)
![Thumbnail [90x90]](https://www.dbi-services.com/blog/wp-content/uploads/2022/08/DWE_web-min-scaled.jpg)