To start into this topic I want to shortly explain some basics. Afterwards I show you how to prepare the configuration files.
Ansible
Ansible is a Open Source automation utility. It is used for orchestration and configuration as well as the administration of PCs/Servers. You could say, okay but we have puppet or saltstack or an other framework, why should I use Ansible? Ansible differs! It has no Agent installed on the systems, it just needs a working SSH connection and a python installation. For deploying changes just write a Ansible Playbook, a simple YAML-File. For further information about Ansible just visit the Ansible Homepage.
DC/OS
Mesosphere’s DC/OS is a distributed operating system based on Apache Mesos (read more). It gives you the possibility to manage multiple machines as if they were one. Resource management, process placement scheduling, simplified installations and management of distributed services can be automated using DC/OS. DC/OS comes with a web interface as well as a command-line interface which can be used for monitoring and remote management.
DC/OS can be used as cluster manager, container platform and operating system. A quite mighty tool. To explain all the functionalities would go to far.
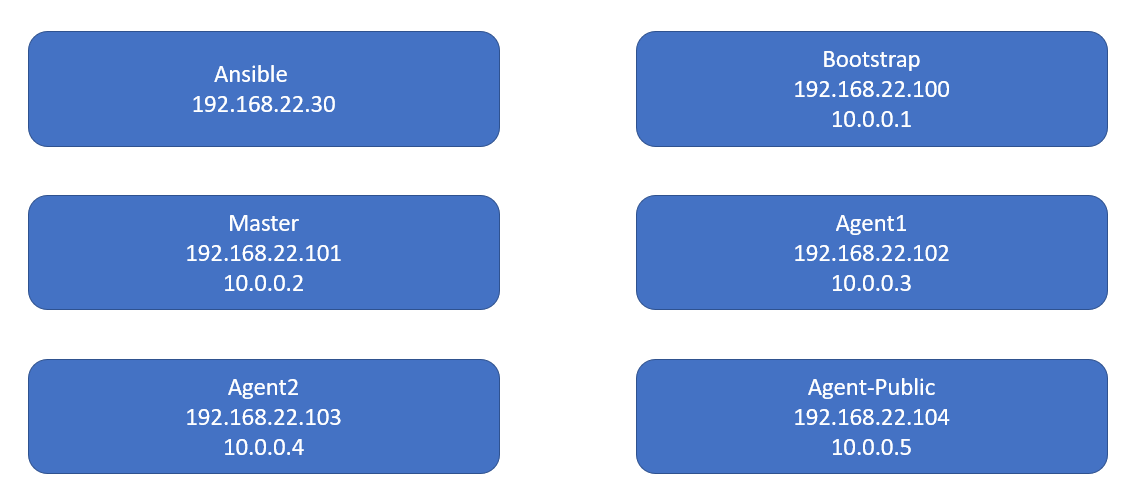
For setup the minimal DC/OS Using Ansible you need at least six servers:
– one Ansible
– one Bootstrap
– one Master
– two private Agents
– one public Agent
Bootstrap Node
In general, the bootstrap is the essential one when you spin up a server. It is used as staging location for the software installation, stores the DC/OS configuration and the bootstrap files for the DC/OS.
Master Node
The DC/OS master manages “the rest” of the cluster. It’s possible to run one or more master nodes. They contain most of the DC/OS components and the Mesos master process. It also provides the web interface, which provides a nice graphical view of the DC/OS Cluster
Private Agent Node
The private agents do not allow access from outside the cluster. They provide resources to the cluster.
Public Agent Node
The public agent node is a node on the network, that allows access from the outside of the DC/OS. The public agent is primary used as a kind of load balancer to decrease the surface that could be accessed by attackers.
In a cluster you need less public agent nodes than private agent nodes as they can handle the multiple agent services.
I just described the node components used for the installation. If you want more and deeper insights into DC/OS and it’s architecture, you can find a detailed documentation on the Mesosphere Homepage
Architecture
For the minimal installation of this DC/OS you need six servers:
Each of the server with a public and a private IP expect the ansible server.
To install the DC/OS using Ansible I used the playbooks from GitHub. But as usual there is some specific stuff, when you test it at your environment.
Prepare the ansible server
Install git and get ansible-dcos from git-hub
[root@dcos-ansible ~]# yum install git -y

[root@dcos-ansible ~]# git clone https://github.com/dcos-labs/ansible-dcos
Cloning into 'ansible-dcos'...
remote: Enumerating objects: 69, done.
remote: Counting objects: 100% (69/69), done.
remote: Compressing objects: 100% (48/48), done.
remote: Total 1957 (delta 25), reused 42 (delta 15), pack-reused 1888
Receiving objects: 100% (1957/1957), 312.95 KiB | 0 bytes/s, done.
Resolving deltas: 100% (982/982), done.

[root@dcos-ansible ~]# cd ansible-dcos/
[root@dcos-ansible ansible-dcos]# git tag
v0.1.0-alpha
v0.2.0-alpha
v0.2.1-alpha
v0.3.0-alpha
v0.4.0-alpha
v0.5.0-dcos-1.10
v0.6.0-dcos-1.11
v0.6.1-dcos-1.11
v0.7.0-dcos-1.11
[root@dcos-ansible ansible-dcos]# git checkout v0.7.0-dcos-1.11
Note: checking out 'v0.7.0-dcos-1.11'.

You are in 'detached HEAD' state. You can look around, make experimental
changes and commit them, and you can discard any commits you make in this
state without impacting any branches by performing another checkout.

If you want to create a new branch to retain commits you create, you may
do so (now or later) by using -b with the checkout command again. Example:

  git checkout -b new_branch_name

HEAD is now at 1f2cf7d... Prepare version v0.7.0-dcos-1.11
Install ansible
[root@dcos-ansible ansible-dcos]# yum install ansible
Prepare the hosts.yaml file
[root@dcos-ansible ansible-dcos]# pwd
/root/ansible-dcos
[root@dcos-ansible ansible-dcos]# cp hosts.example.yaml hosts.yaml

[root@dcos-ansible ansible-dcos]# cat hosts.yaml
---
# Example for an ansible inventory file
all:
  children:
    bootstraps:
      hosts:
        # Public IP Address of the Bootstrap Node
        192.168.22.100:
    masters:
      hosts:
        # Public IP Addresses for the Master Nodes
        192.168.22.101:
    agents:
      hosts:
        # Public IP Addresses for the Agent Nodes
        192.168.22.102:
        192.168.22.103:
    agent_publics:
      hosts:
        # Public IP Addresses for the Public Agent Nodes
        192.168.22.104:
  vars:
    # IaaS target for DC/OS deployment
    # options: aws, gcp, azure or onprem
    dcos_iaas_target: 'onprem'

    # Choose the IP Detect Script
    # options: eth0, eth1, ... (or other device name for existing network interface)
    dcos_ip_detect_interface: 'eth0'

    # (internal/private) IP Address of the Bootstrap Node
    dcos_bootstrap_ip: '10.0.0.1'

    # (internal/private) IP Addresses for the Master Nodes
    dcos_master_list:
      - 10.0.0.2

    # DNS Resolvers
    dcos_resolvers:
      - 8.8.4.4
      - 8.8.8.8

    # DNS Search Domain
    dcos_dns_search: 'None'

    # Internal Loadbalancer DNS for Masters (only needed for exhibitor: aws_s3)
    dcos_exhibitor_address: 'masterlb.internal'

    # External Loadbalancer DNS for Masters or
    # (external/public) Master Node IP Address (only needed for cli setup)
    dcos_master_address: 'masterlb.external'
Create the setup variables for DC/OS
[root@dcos-ansible ansible-dcos]# pwd
/root/ansible-dcos
cp group_vars/all.example group_vars/all
enable SSH access on nodes with Ansible
In case of authentication problem using ansible playbooks, repeat the steps with “exec….” and “sshd-add…”
ssh-keygen -t rsa -b 4096 -C "[email protected]" -f ~/.ssh/ansible-dcos
[root@dcos-ansible ansible-dcos]# exec /usr/bin/ssh-agent $SHELL
[root@dcos-ansible ansible-dcos]# ssh-add ~/.ssh/ansible-dcos
Enter passphrase for /root/.ssh/ansible-dcos:
Identity added: /root/.ssh/ansible-dcos (/root/.ssh/ansible-dcos)
Enter lines for initial SSH access on all nodes with ansible in group_vars/all
All systems must have the same username/password combination, otherwise ansible runs into failures.
In this step you have to change only the last 4 lines of group_vars/all
[root@dcos-ansible ansible-dcos]# cat group_vars/all
---
# Install latest operating system updates
os_system_updates: False

# DC/OS cluster version
dcos_version: '1.11.4'

# If planning to upgrade a previous deployed DC/OS Cluster,
# uncomment the following variable
#dcos_upgrade_from_version: '1.11.3'

# Download URL for DC/OS
dcos_download: "https://downloads.dcos.io/dcos/stable/{{ dcos_version }}/dcos_generate_config.sh"

# Name of the DC/OS Cluster
dcos_cluster_name: 'demo'

# Deploy Mesosphere Enterprise DC/OS or DC/OS OSS?
dcos_deploy_ee_package: False

# Optional if dcos_iaas_target := aws
#dcos_exhibitor: 'aws_s3'
#dcos_aws_access_key_id: '******'
#dcos_aws_secret_access_key: '******'
#dcos_aws_region: 'us-west-2'
#dcos_s3_bucket: 'bucket-name'

# Optional if dcos_iaas_target := azure
#dcos_exhibitor: 'azure'
#dcos_exhibitor_azure_account_name: 'name'
#dcos_exhibitor_azure_account_key: '******'

# Only required when deploying Mesosphere Enterprise DC/OS
dcos_ee_security: 'permissive'
dcos_ee_license_key_contents: '******'
dcos_ee_superuser_username: admin
# Default password:= admin
dcos_ee_superuser_password_hash: "$6$rounds=656000$8CXbMqwuglDt3Yai$ZkLEj8zS.GmPGWt.dhwAv0.XsjYXwVHuS9aHh3DMcfGaz45OpGxC5oQPXUUpFLMkqlXCfhXMloIzE0Xh8VwHJ."

# Configure rexray to enable support of external volumes (only for Mesosphere Enterprise DC/OS)
# Note: Set rexray_config_method: file and edit ./roles/bootstrap/templates/rexray.yaml.j2 for a custom rexray configuration
# options: empty, file
dcos_ee_rexray_config_method: empty

#For initial SSH access on nodes with Ansible
ansible_password: "password"
ansible_become_pass: "password"
#initial_remote_user: root
Change ansible configuration file
[defaults]
inventory = hosts.yaml
host_key_checking = False
remote_user = ansible
roles_path = ./roles
[all:vars]
ansible_connection=ssh
ansible_user=ansible
ansible_ssh_pass=password
Insert the servers to Ansible hosts file
As most of this file is commented out, I just post the section I added
[root@dcos-ansible ansible-dcos]# cat /etc/ansible/hosts
[dcos_servers]
192.168.22.100
192.168.22.101
192.168.22.102
192.168.22.103
192.168.22.104
Finally we can start with the playbooks – Read part 2 for this
![Thumbnail [60x60]](https://www.dbi-services.com/blog/wp-content/uploads/2022/08/GWI_web-min-scaled.jpg)
![Thumbnail [90x90]](https://www.dbi-services.com/blog/wp-content/uploads/2022/08/DWE_web-min-scaled.jpg)