In the last post I described how you can create your own PostgreSQL image in Nutanix Era. In Nutanix wording this is a “Software profile”. This profile can now be used to deploy PostgreSQL VMs with just a few clicks or by using the API. In this post we’ll look at how this can be done and if it is really as easy as Nutanix promises. We’ll be doing it by using the graphical console first and then by using the API. Lets go.
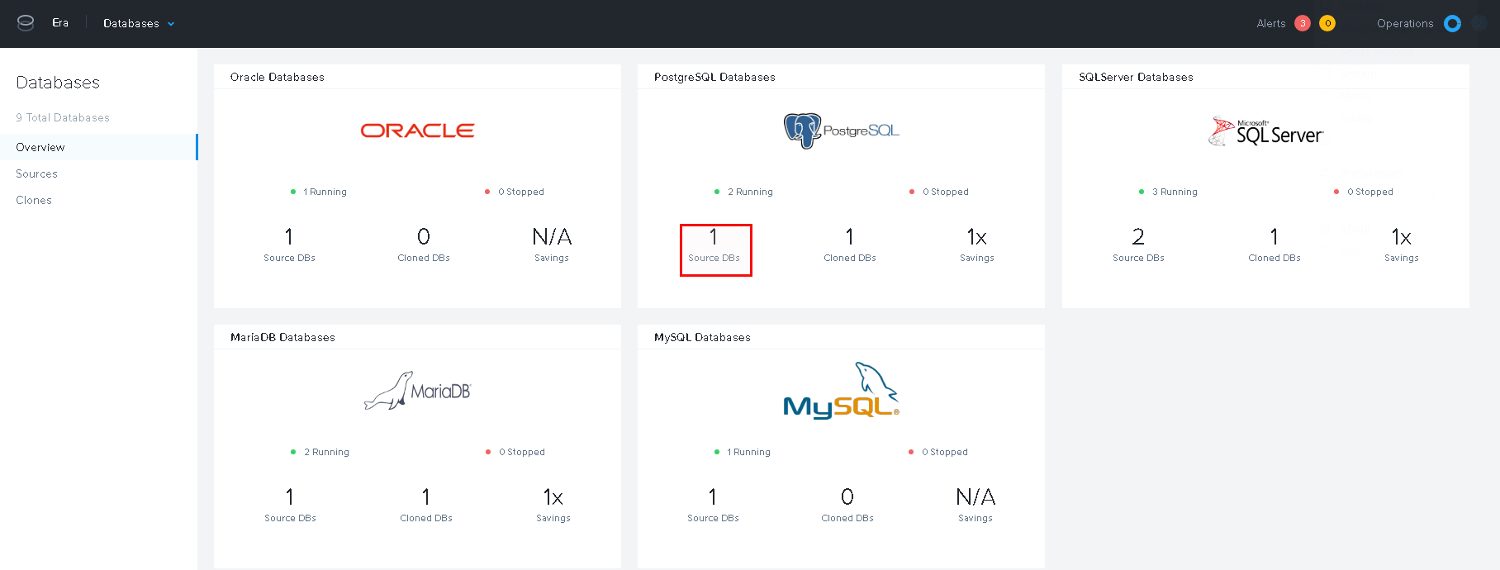
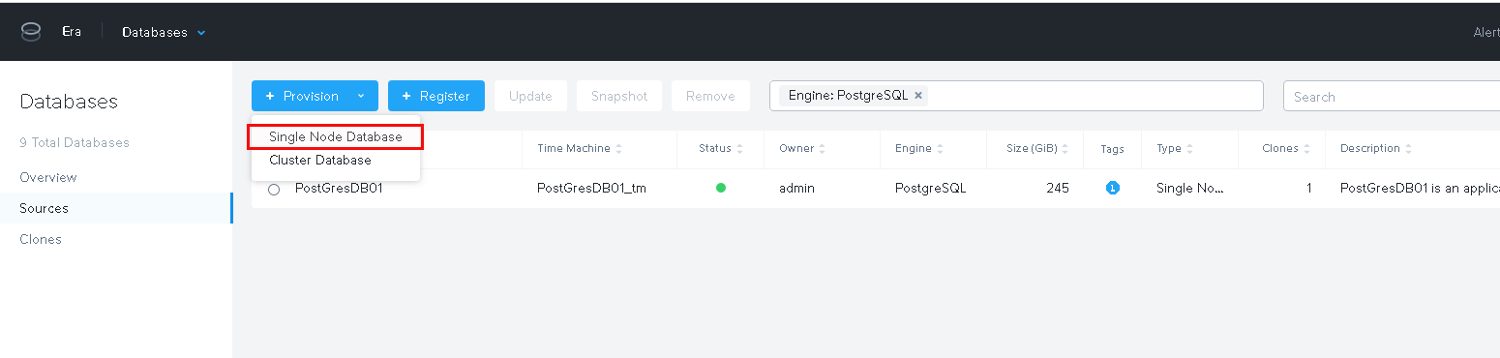
For deploying new databases we obviously need to go to the database section of Era:
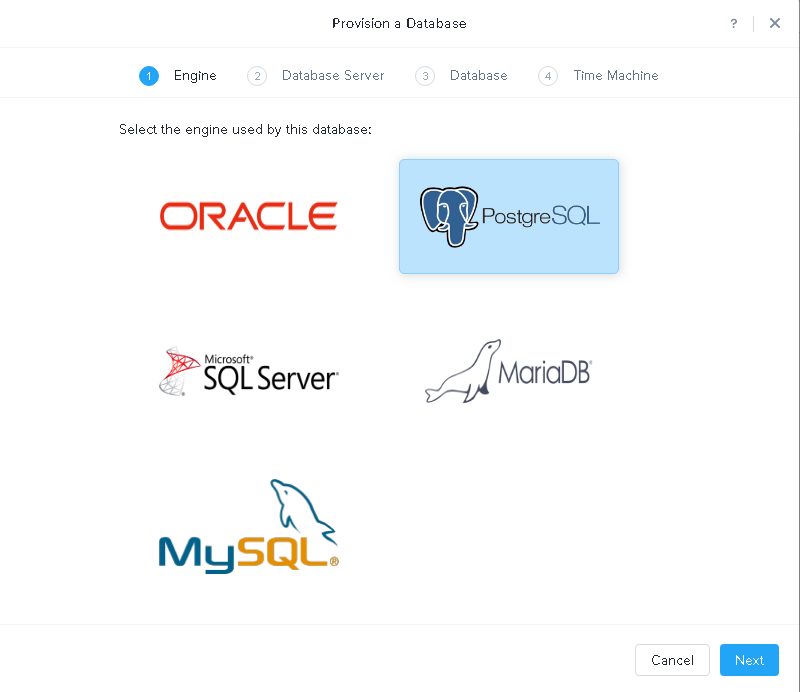
For now we are going to deploy a single instance:
Our new software profile is available and this is what we use. Additionally a public ssh key should be provided for accessing the node:

Provide the details for the new instance:

Time machine allows you to go back in time and creates automatic storage snapshots according to the schedule you define here:
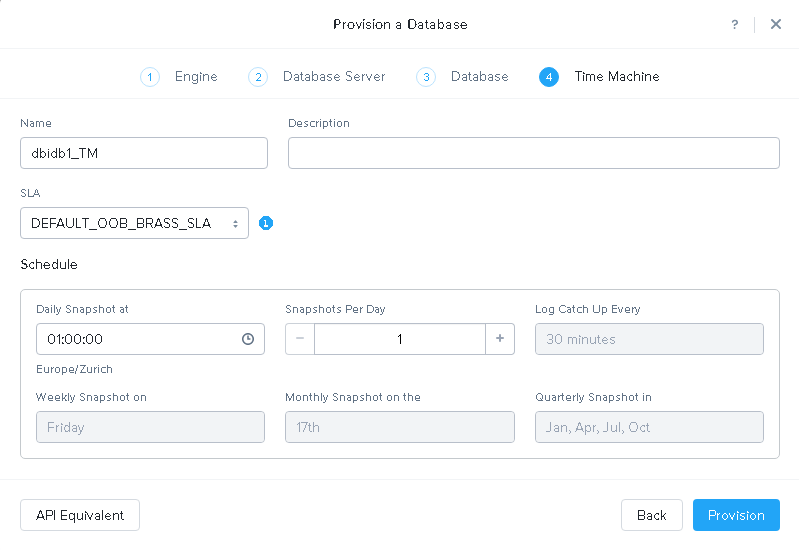
SLAs define retention policies for the snapshots. I will not cover that her.
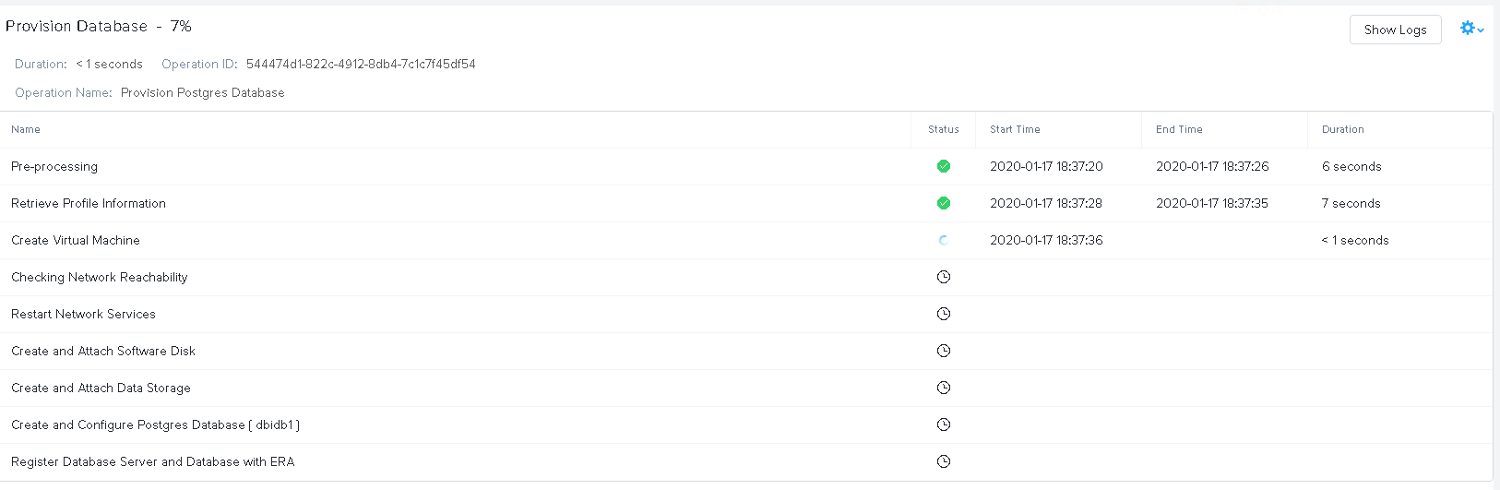
Kick it off and wait for the task to finish:
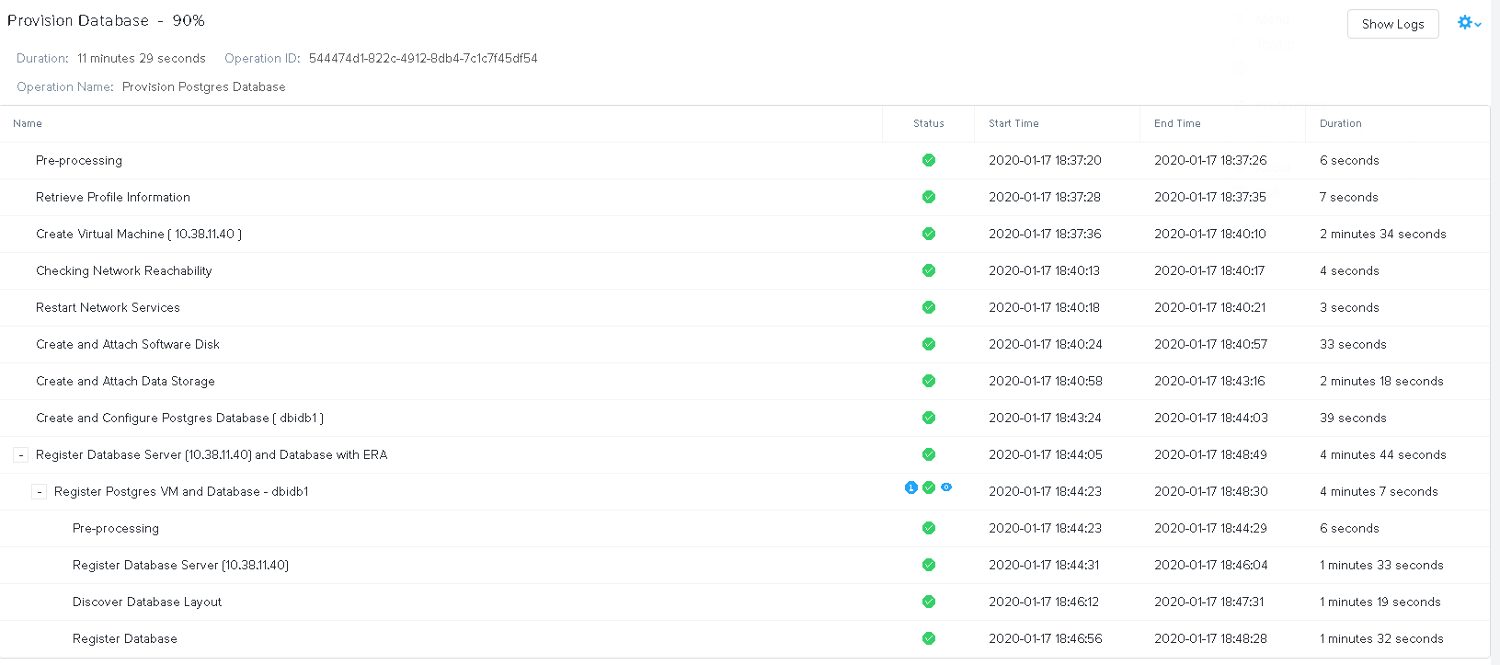
A few minutes later it is done:
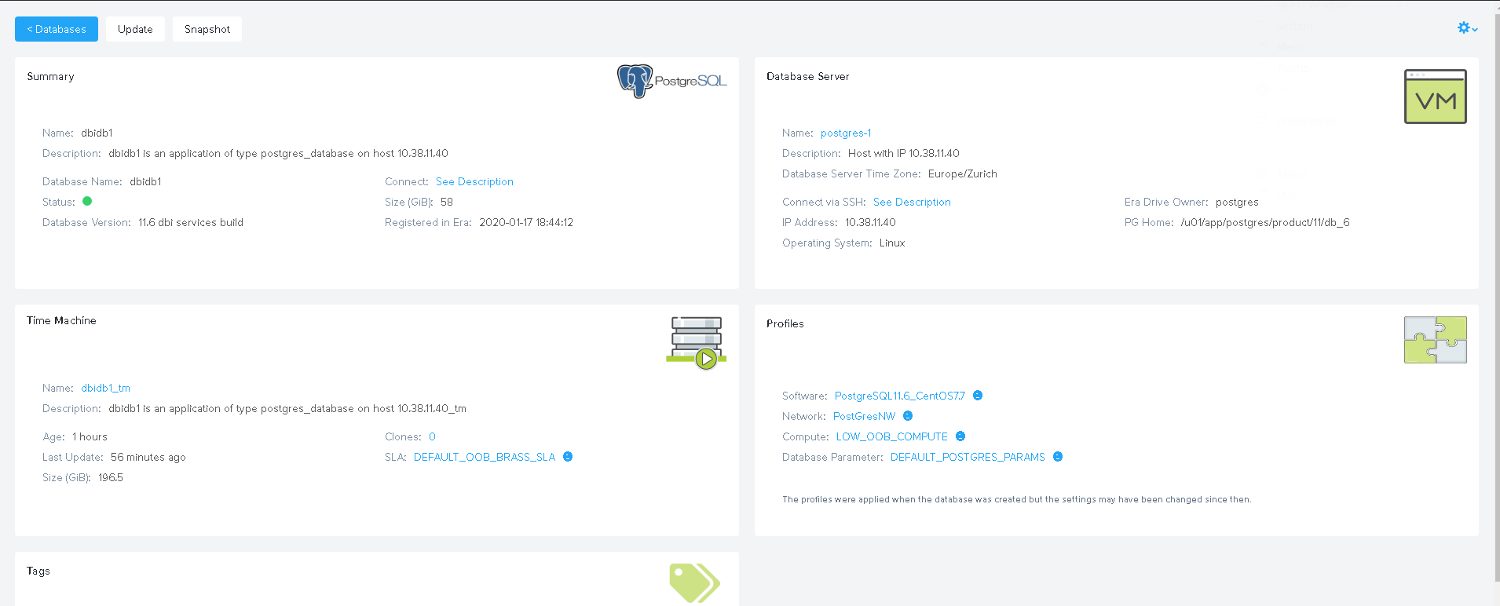
Our new database is ready:

From a deployment point of view this is super simple: A few clicks and a new PostgreSQL server is ready to use in minutes. The API call to do the same on the command line would be this:
curl -k -X POST \
	https://10.38.11.9/era/v0.8/databases/provision \
	-H 'Content-Type: application/json' \
	-H 'Authorization: Basic YWRtaW46bngyVGVjaDAwNyE=' \
	-d \
	'{"databaseType":"postgres_database","databaseName":"db2","databaseDescription":"db2","clusterId":"ccdab636-2a11-477b-a358-2b8db0382421","softwareProfileId":"aa099964-e17c-4264-b047-00881dc5e2f8","softwareProfileVersionId":"7ae7a44c-d7c5-46bc-bf0f-f9fe7665f537","computeProfileId":"fb1d20bb-38e4-4964-852f-6209990402c6","networkProfileId":"8ed5214c-4e2a-4ce5-a899-a07103bc60cc","dbParameterProfileId":"3679ab5b-7688-41c4-bcf3-9fb4491544ea","newDbServerTimeZone":"Europe/Zurich","timeMachineInfo":{"name":"db2_TM","description":"","slaId":"4d9dcd6d-b6f8-47f0-8015-9e691c1d3cf4","schedule":{"snapshotTimeOfDay":{"hours":1,"minutes":0,"seconds":0},"continuousSchedule":{"enabled":true,"logBackupInterval":30,"snapshotsPerDay":1},"weeklySchedule":{"enabled":true,"dayOfWeek":"FRIDAY"},"monthlySchedule":{"enabled":true,"dayOfMonth":"17"},"quartelySchedule":{"enabled":true,"startMonth":"JANUARY","dayOfMonth":"17"},"yearlySchedule":{"enabled":false,"dayOfMonth":31,"month":"DECEMBER"}},"tags":[],"autoTuneLogDrive":true},"provisionInfo":[{"name":"application_type","value":"postgres_database"},{"name":"nodes","value":"1"},{"name":"listener_port","value":"5432"},{"name":"proxy_read_port","value":"5001"},{"name":"proxy_write_port","value":"5000"},{"name":"database_size","value":10},{"name":"working_dir","value":"/tmp"},{"name":"auto_tune_staging_drive","value":true},{"name":"enable_synchronous_mode","value":false},{"name":"dbserver_name","value":"postgres-2"},{"name":"dbserver_description","value":"postgres-2"},{"name":"ssh_public_key","value":"ssh-rsa AAAAB3NzaC1yc2EAAAADAQABAAABAQDgJb4co+aaRuyAJv8F6fsz2YgO0ZHldX6qS22c813iDeUGWP/1bGhF598uODlgK5nx29sW2WTlcmorZuCgHC2BJfzhL1xsL5Ca94uAEg48MbA+1+Woe49mF6bPDJWLXqC0YUpCDBZI9VHnrij4QhX2r3G87W0WNnNww1POwIJN3xpVq/DnDWye+9ZL3s+eGR8d5f71iKnBo0BkcvY5gliOtM/DuLT7Cs7KkjPgY+S6l5Cztvcj6hGO96zwlOVN3kjB18RH/4q6B7YkhSxgTDMXCdoOf9F6BIhAjZga4lodHGbkMEBW+BJOnYnFTl+jVB/aY1dALECnh4V+rr0Pd8EL daw@ltdaw"},{"name":"db_password","value":"postgres"}]}'
As said, provisioning is easy. Now lets see how the instance got created. Using the IP Address that was assigned, the postgres user and the public ssh key we provided we can connect to the VM:
ssh [email protected]
The authenticity of host '10.38.11.40 (10.38.11.40)' can't be established.
ECDSA key fingerprint is SHA256:rN4QzdL2y55Lv8oALnW6pBQzBKOInP+X4obiJrqvK8o.
Are you sure you want to continue connecting (yes/no)? yes
Warning: Permanently added '10.38.11.40' (ECDSA) to the list of known hosts.
Last login: Fri Jan 17 18:48:26 2020 from 10.38.11.9
The first thing I would try is to connect to PostgreSQL:
-bash-4.2$ psql postgres
psql (11.6 dbi services build)
Type "help" for help.

postgres=# select version();
                                                          version
----------------------------------------------------------------------------------------------------------------------------
 PostgreSQL 11.6 on x86_64-pc-linux-gnu, compiled by gcc (GCC) 4.8.5 20150623 (Red Hat 4.8.5-39), 64-bit
(1 row)

postgres=#
Ok, that works. What I did before I created the Software profile in the last post: I installed our DMK and that gets started automatically as the required stuff is added to “.bash_profile” (you can see that in the last post because PS1 is not the default). But here I did not get our environment because Era has overwritten “.bash_profile”:
-bash-4.2$ cat .bash_profile
export PATH=/usr/lib64/qt-3.3/bin:/usr/local/bin:/usr/bin:/u01/app/postgres/product/11/db_6/bin:/u01/app/postgres/product/11/db_6/bin
export PGDATA=/pg_data_544474d1_822c_4912_8db4_7c1c7f45df54
export PGDATABASE=postgres
export PGUSER=postgres
export PGPORT=5432
export ANSIBLE_LIBRARY=/opt/era_base/era_engine/drivers/nutanix_era/era_drivers/AnsibleModules/bin
Would be great if the original “.bash_profile” would still be there so custom adjustment are not lost.
Looking at mountpoinzs:
-bash-4.2$ df -h
Filesystem                                                                                                                          Size  Used Avail Use% Mounted on
devtmpfs                                                                                                                            7.8G     0  7.8G   0% /dev
tmpfs                                                                                                                               7.8G  8.0K  7.8G   1% /dev/shm
tmpfs                                                                                                                               7.8G  9.7M  7.8G   1% /run
tmpfs                                                                                                                               7.8G     0  7.8G   0% /sys/fs/cgroup
/dev/mapper/centos_centos7postgres12-root                                                                                            26G  2.4G   24G   9% /
/dev/sda1                                                                                                                          1014M  149M  866M  15% /boot
/dev/sdb                                                                                                                             27G   74M   26G   1% /u01/app/postgres/product/11/db_6
tmpfs                                                                                                                               1.6G     0  1.6G   0% /run/user/1000
/dev/mapper/VG_PG_DATA_544474d1_822c_4912_8db4_7c1c7f45df54-LV_PG_DATA_544474d1_822c_4912_8db4_7c1c7f45df54                          50G  108M   47G   1% /pg_data_544474d1_822c_4912_8db4_7c1c7f45df54
/dev/mapper/VG_PG_DATA_TBLSPC_544474d1_822c_4912_8db4_7c1c7f45df54-LV_PG_DATA_TBLSPC_544474d1_822c_4912_8db4_7c1c7f45df54           9.8G   44M  9.2G   1% /pg_dbidb1_544474d1_822c_4912_8db4_7c1c7f45df54
/dev/mapper/ntnx_era_agent_vg_1700f784395111eab53f506b8d241a39-ntnx_era_agent_lv_era_software_1700f784395111eab53f506b8d241a39      1.5G  534M  821M  40% /opt/era_base/era_engine
/dev/mapper/ntnx_era_agent_vg_1700f784395111eab53f506b8d241a39-ntnx_era_agent_lv_era_logs_1700f784395111eab53f506b8d241a39          3.9G   18M  3.6G   1% /opt/era_base/logs
/dev/mapper/ntnx_era_agent_vg_1700f784395111eab53f506b8d241a39-ntnx_era_agent_lv_era_config_1700f784395111eab53f506b8d241a39         47M  1.1M   42M   3% /opt/era_base/cfg
/dev/mapper/ntnx_era_agent_vg_5c3a7120261b4354a3b38ee168726298-ntnx_era_agent_lv_db_stagging_logs_5c3a7120261b4354a3b38ee168726298   99G   93M   94G   1% /opt/era_base/db_logs
The PostgreSQL binaries got their own mountpoint. PGDATA is on its own mountpoint and it seems we have a tablespace in “/pg_dbidb1_544474d1_822c_4912_8db4_7c1c7f45df54”:
-bash-4.2$ psql -c "\db" postgres
                            List of tablespaces
     Name      |  Owner   |                    Location
---------------+----------+-------------------------------------------------
 pg_default    | postgres |
 pg_global     | postgres |
 tblspc_dbidb1 | postgres | /pg_dbidb1_544474d1_822c_4912_8db4_7c1c7f45df54
(3 rows)

-bash-4.2$ psql -c "\l+" postgres
                                                                     List of databases
   Name    |  Owner   | Encoding |   Collate   |    Ctype    |   Access privileges   |  Size   |  Tablespace   |                Description
-----------+----------+----------+-------------+-------------+-----------------------+---------+---------------+--------------------------------------------
 dbidb1    | postgres | UTF8     | en_US.UTF-8 | en_US.UTF-8 |                       | 7717 kB | tblspc_dbidb1 |
 postgres  | postgres | UTF8     | en_US.UTF-8 | en_US.UTF-8 |                       | 7717 kB | pg_default    | default administrative connection database
 template0 | postgres | UTF8     | en_US.UTF-8 | en_US.UTF-8 | =c/postgres          +| 7577 kB | pg_default    | unmodifiable empty database
           |          |          |             |             | postgres=CTc/postgres |         |               |
 template1 | postgres | UTF8     | en_US.UTF-8 | en_US.UTF-8 | =c/postgres          +| 7577 kB | pg_default    | default template for new databases
           |          |          |             |             | postgres=CTc/postgres |         |               |
(4 rows)
This confirms that our database “dbidb1” was placed into a separate tablespace. There is another mountpoint which seems to be there for the archived WAL files, and we can confirm that as well:
-bash-4.2$ psql
psql (11.6 dbi services build)
Type "help" for help.

postgres=# show archive_command ;
                      archive_command
-----------------------------------------------------------
  sh /opt/era_base/cfg/postgres/archive_command.sh %p  %f
(1 row)

postgres=# \! cat /opt/era_base/cfg/postgres/archive_command.sh
test ! -f /opt/era_base/db_logs/dbidb1/$2 &&  cp -p $1 /opt/era_base/db_logs/dbidb1//$2
postgres=#
So archiving is enabled and this is what I expected. The costing parameters seem to be the default:
postgres=# select name,setting from pg_settings where name like '%cost%';
             name             | setting
------------------------------+---------
 autovacuum_vacuum_cost_delay | 20
 autovacuum_vacuum_cost_limit | -1
 cpu_index_tuple_cost         | 0.005
 cpu_operator_cost            | 0.0025
 cpu_tuple_cost               | 0.01
 jit_above_cost               | 100000
 jit_inline_above_cost        | 500000
 jit_optimize_above_cost      | 500000
 parallel_setup_cost          | 1000
 parallel_tuple_cost          | 0.1
 random_page_cost             | 4
 seq_page_cost                | 1
 vacuum_cost_delay            | 0
 vacuum_cost_limit            | 200
 vacuum_cost_page_dirty       | 20
 vacuum_cost_page_hit         | 1
 vacuum_cost_page_miss        | 10
(17 rows)
Memory parameters seem to be the default as well:
postgres=# show shared_buffers ;
 shared_buffers
----------------
 128MB
(1 row)

postgres=# show work_mem;
 work_mem
----------
 4MB
(1 row)

postgres=# show maintenance_work_mem ;
 maintenance_work_mem
----------------------
 64MB
(1 row)

postgres=# show effective_cache_size ;
 effective_cache_size
----------------------
 4GB
(1 row)
There are “Parameter profiles” you can use and create but currently there are not that many parameters that can be adjusted:
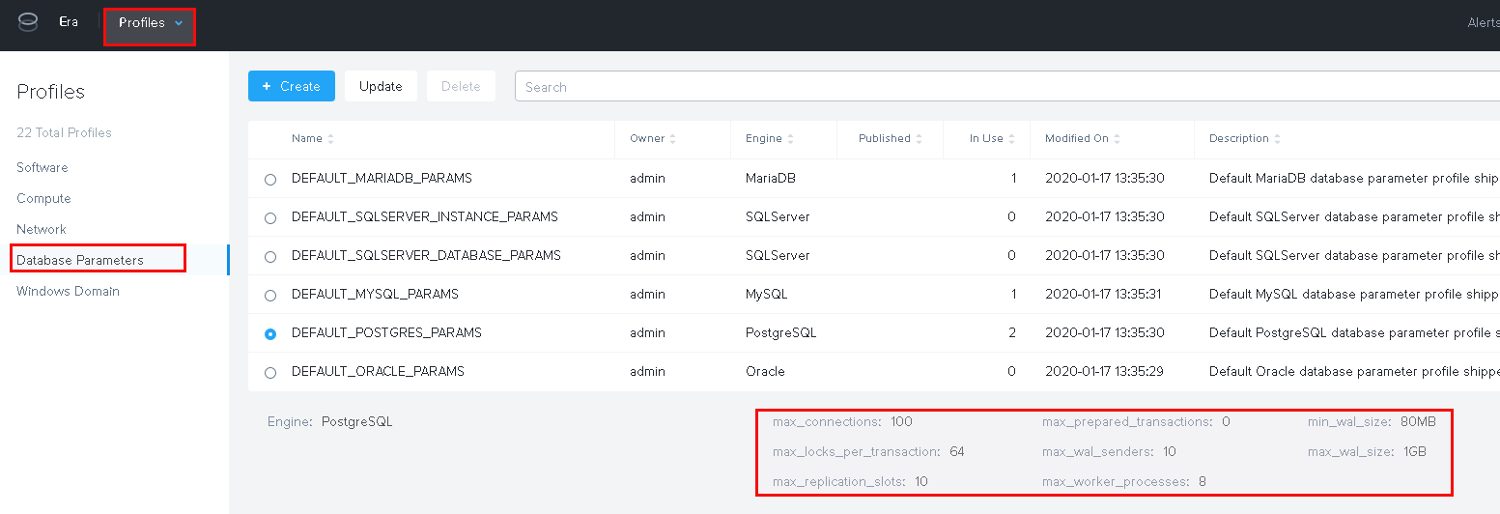
That’s it for now. Deploying new PostgreSQL instances is really easy. I am currently not sure why there needs to be a tablespace but maybe that becomes clear in a future post when we’ll look at backup and restore. From a PostgreSQL configuration perspective you for sure need to do some adjustments when the databases become bigger and load increases.
![Thumbnail [60x60]](https://www.dbi-services.com/blog/wp-content/uploads/2022/08/DWE_web-min-scaled.jpg)