In my previous blog, I described the process to install a Kerberos Client and how to Kerberized Alfresco. In this blog, I will continue in the same way and present another application that could be configured to use the Kerberos MIT KDC: Liferay. Liferay is a very popular and a leader in Open Source solution for enterprise web platform (Intranet/Extranet/Internet web sites). Liferay could be bundled with several application servers like Tomcat, JBoss, Glassfish, but it could also be installed from scratch (deployment of a war file) with a lot of existing application servers.
For this blog, I will need the following properties/variables:
- example.com = the DNS Domain
- EXAMPLE.COM = the KDC REALM
- kdc01oel.example.com = the FQDN of the KDC
- [email protected] = the principal of a test user
- lif01.example.com = the FQDN of the Liferay host server
- otrs01.example.com = the FQDN of the OTRS host server
Please be aware that some configurations below may not be appropriate for production environment. For example, I don’t configure Apache to run as a different user like “www” or “apache”, I don’t specify the installation directory for Apache or Kerberos, aso…
Actual test configuration:
- OS: Oracle Enterprise Linux 6
- Liferay: Liferay Community Edition 6.1.1 GA2 – installed on /opt/liferay-6.1.1
- Application Server: Tomcat 7.0.27 – listening on port 8080
This version of Liferay doesn’t have a default connection to a Linux KDC so everything should be done from scratch. The first thing to do is to add an Apache httpd in front of Liferay, if there is not already one, to process Kerberos requests. This part is described very quickly without extensive explanations because we don’t need all the functionalities of Apache. Of course you can, if you want, add some other configurations to the Apache httpd to manage for example an SSL certificate, the security of your application or other very important features of Apache… So first let’s check that the Tomcat used by Liferay is well configured for Kerberos with an Apache front-end:
- The HTTP port should be 8080 for this configuration
- The maxHttpHeaderSize must be increased to avoid authentication errors because an http header with a Kerberos ticket is much more bigger than a standard http header
- The AJP port should be 8009 for this configuration
- The tomcatAuthentication must be disabled to delegate the authentication to Apache
To verify that, just take a look at the file server.xml:
[root ~]# vi /opt/liferay-6.1.1/tomcat-7.0.27/conf/server.xml
Then download Apache httpd from the Apache web site (or use yum/apt-get), extract the downloaded file and go inside of the extracted folder to install this Apache httpd with some default parameters:
[root ~]# cd /opt
[root opt]# wget http://mirror.switch.ch/mirror/apache/dist//httpd/httpd-2.4.10.tar.gz
[root opt]# tar -xvf httpd-2.4.10.tar.gz
[root opt]# cd httpd-2.4.10
[root httpd-2.4.10]# ./configure
[root httpd-2.4.10]# make
[root httpd-2.4.10]# make install
This will install Apache httpd 2.4.10 under /usr/local/apache2. There could be some errors during the execution of “./configure” or “make” or “make install” but these kind of issues are generally well known and so the solutions to these issues could be found everywhere on Internet. An installation with the command apt-get will put the configuration file (named apache2.conf not httpd.conf) under /etc/apache2/ so please adapt the description below to your environment.
Once Apache httpd is installed, it must be configured to understand and use Kerberos for all incoming requests:
[root httpd-2.4.10]# vi /usr/local/apache2/conf/httpd.conf
    # Add at the end of the file
    Include /opt/liferay-6.1.1/tomcat-7.0.27/conf/mod_jk.conf
    Include /usr/local/apache2/conf/mod_kerb.conf

[root httpd-2.4.10]# vi /usr/local/apache2/conf/mod_kerb.conf
    # New file for the configuration of the module "mod_auth_kerb" and Kerberos
    ServerAdmin root@localhost
    # The FQDN of the host server
    ServerName lif01.example.com:80

    # Of course, find the location of the mod_auth_kerb and replace it there if
    # it's not the same
    LoadModule auth_kerb_module /usr/local/apache2/modules/mod_auth_kerb.so

    ‹Location /›
        AuthName "EXAMPLE.COM"
        AuthType Kerberos
        Krb5Keytab /etc/krb5lif.keytab
        KrbAuthRealms EXAMPLE.COM
        KrbMethodNegotiate On
        KrbMethodK5Passwd On
        require valid-user
    ‹/Location›
The next step is to build the mod_auth_kerb and mod_jk. The build of mod_auth_kerb requires an already installed Kerberos client in this Liferay server. As seen below, my Kerberos client on this server is under /usr/local. Moreover, the buid of mod_jk may requires to specify the apxs binary used by Apache, that’s why there is the “–with-apxs” parameter:
[root httpd-2.4.10]# cd ..
[root opt]# wget http://sourceforge.net/projects/modauthkerb/files/mod_auth_kerb/mod_auth_kerb-5.4/mod_auth_kerb-5.4.tar.gz/download
[root opt]# tar -xvf mod_auth_kerb-5.4.tar.gz
[root opt]# cd mod_auth_kerb-5.4
[root mod_auth_kerb-5.4]# ./configure --with-krb4=no --with-krb5=/usr/local --with-apache=/usr/local/apache2
[root mod_auth_kerb-5.4]# make
[root mod_auth_kerb-5.4]# make install

[root mod_auth_kerb-5.4]# cd ..
[root opt]# wget http://mirror.switch.ch/mirror/apache/dist/tomcat/tomcat-connectors/jk/tomcat-connectors-1.2.40-src.tar.gz
[root opt]# tar -xvf tomcat-connectors-1.2.40-src.tar.gz
[root opt]# cd tomcat-connectors-1.2.40-src/native
[root native]# ./configure --with-apxs=/usr/local/apache2/bin/apxs --enable-api-compatibility
[root native]# make
[root native]# make install
The module auth_mod_kerb doesn’t need extra configuration but it’s not the case of the mod_jk for which we will need to define several elements like log file and level, JkMount parameters which defines http requests that should be sent to the AJP connector, aso:
[root native]# cd ../..
[root opt]# vi /opt/liferay-6.1.1/tomcat/conf/mod_jk.conf
    LoadModule jk_module /usr/local/apache2/modules/mod_jk.so
    JkWorkersFile /opt/liferay-6.1.1/tomcat-7.0.27/conf/workers.properties
    JkLogFile /usr/local/apache2/logs/mod_jk.log
    JkLogLevel debug
    JkLogStampFormat "[%a %b %d %H:%M:%S %Y]"
    # JkOptions indicate to send SSL KEY SIZE,
    JkOptions +ForwardKeySize +ForwardURICompat -ForwardDirectories
    # JkRequestLogFormat set the request format
    JkRequestLogFormat "%w %V %T"
    JkMount / ajp13
    JkMount /* ajp13

[root opt]# vi /opt/liferay-6.1.1/tomcat/conf/workers.properties
    # Define 1 real worker named ajp13
    worker.list=ajp13
    worker.ajp13.type=ajp13
    worker.ajp13.host=localhost
    worker.ajp13.port=8009
    worker.ajp13.lbfactor=50
    worker.ajp13.cachesize=10
    worker.ajp13.cache_timeout=600
    worker.ajp13.socket_keepalive=1
    worker.ajp13.socket_timeout=300
Finally, the last configuration for Apache httpd is to configure a krb5.conf file for the Kerberos client to know where the KDC is located:
[root opt]# vi /etc/krb5.conf
    [libdefaults]
        default_realm = EXAMPLE.COM

    [realms]
        EXAMPLE.COM = {
            kdc = kdc01oel.example.com:88
            admin_server = kdc01oel.example.com:749
            default_domain = example.com
        }

    [domain_realm]
        .example.com = EXAMPLE.COM
        example.com = EXAMPLE.COM
Once this is done, there is one step to execute on the KDC side for the configuration of Kerberos. Indeed, there is a configuration above in the file mod_kerb.conf that shows a keytab file named krb5lif.keytab. By default, this file doesn’t exist so we must create it! From the KDC host server, execute the following commands to create a new service account for Liferay and then create the keytab for this service account:
[root opt]# kadmin
    Authenticating as principal root/[email protected] with password.
    Password for root/[email protected]:  ##Enter here the root admin password##

kadmin:  addprinc HTTP/[email protected]
    WARNING: no policy specified for HTTP/[email protected]; defaulting to no policy
    Enter password for principal "HTTP/[email protected]":  ##Enter a new password for this service account##
    Re-enter password for principal "HTTP/[email protected]":  ##Enter a new password for this service account##
    Principal "HTTP/[email protected]" created.

kadmin:  ktadd -k /etc/krb5lif.keytab HTTP/[email protected]
    Entry for principal HTTP/[email protected] with kvno 2, encryption type aes256-cts-hmac-sha1-96 added to keytab WRFILE:/etc/krb5lif.keytab.
    Entry for principal HTTP/[email protected] with kvno 2, encryption type aes128-cts-hmac-sha1-96 added to keytab WRFILE:/etc/krb5lif.keytab.
    Entry for principal HTTP/[email protected] with kvno 2, encryption type des3-cbc-sha1 added to keytab WRFILE:/etc/krb5lif.keytab.
    Entry for principal HTTP/[email protected] with kvno 2, encryption type arcfour-hmac added to keytab WRFILE:/etc/krb5lif.keytab.

kadmin:  exit

[root opt]# scp /etc/krb5lif.keytab [email protected]:/etc/
    [email protected]'s password:
    krb5lif.keytab    [====================================›]    100%    406    0.4KB/s    00:00
[root opt]# exit
From now on, all configurations required by Apache & Tomcat to handle Kerberos tickets are done. The only remaining step and certainly the most complicated is to configure Liferay to understand and use this kind of authentication. For that purpose, a Liferay Hook must be created (in eclipse using the Liferay Plugin for example). Let’s name this Liferay Project created with the liferay-plugins-sdk-6.1.1: “custom-hook”. For the configuration below, I will suppose that this project is at the following location: “C:/liferay-plugins-sdk-6.1.1/hooks/custom-hook/” and this location is abbreviated to %CUSTOM_HOOK%. You will find at the bottom of this blog a link to download the files that should be in this custom-hook. Feel free to use it!
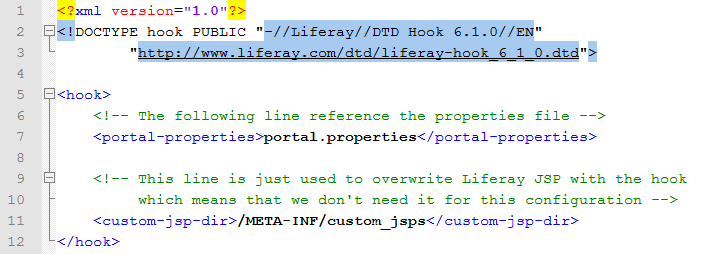
To create a new authentication method, the first step is to create and edit the file %CUSTOM_HOOK%/docroot/WEB-INF/liferay-hook.xml as follow:
Then, create and insert in the file %CUSTOM_HOOK%/docroot/WEB-INF/src/portal.properties the following lines:
    # This line defines the new auto login authentication used by Liferay
    auto.login.hooks=com.liferay.portal.security.auth.KerberosAutoLogin
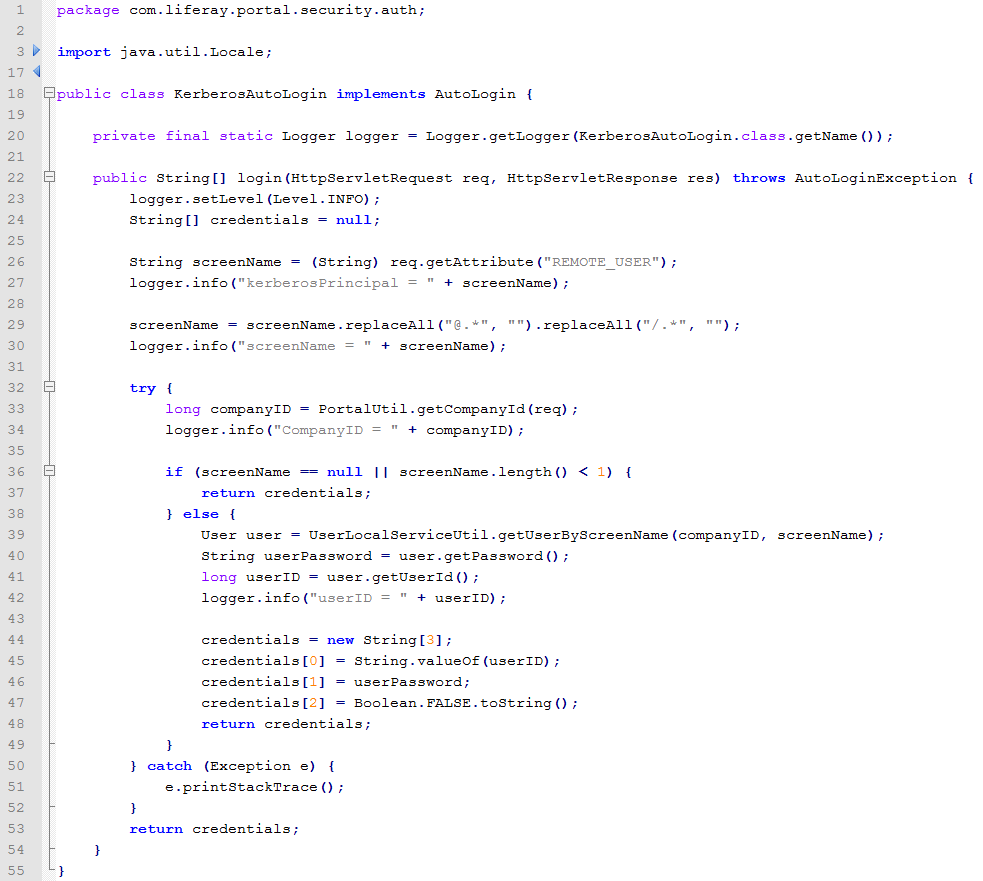
And finally, the last step is to create the Java Class %CUSTOM_HOOK%/docroot/WEB-INF/src/com/liferay/portal/security/auth/KerberosAutoLogin with the following content. This class is used to retrieve the Kerberos principal from the Kerberos Ticket received by Apache and then transforms this principal to log the user in Liferay. Please be aware that this code can probably not be used as such because it’s specific to our company: the screenName used in Liferay is equal to the principal used in the KDC. That’s why there is some logger.info in the code: to help you to find the good relation between the Liferay screenName and the KDC principal.
After that, just build your hook and deploy it using the liferay deploy folder (/opt/liferay-6.1.1/deploy/). If necessary, restart Apache and Liferay using the services or the control scripts:
[root opt]# /opt/liferay-6.1.1/tomcat-7.0.27/bin/shutdown.sh
[root opt]# /opt/liferay-6.1.1/tomcat-7.0.27/bin/startup.sh
[root opt]# /usr/local/apache2/bin/apachectl -k stop
[root opt]# /usr/local/apache2/bin/apachectl -f /usr/local/apache2/conf/httpd.conf
Wait for Liferay to start and that’s it, you should be able to obtain a Kerberos Ticket from the KDC, access to Liferay (through Apache on port 80) and you should be logged in automatically. That’s MAGIC!
Thanks for reading and I hope you will be able to work with Kerberos for a long long time =).
Custom hook download link: custom-hook.zip


![Thumbnail [60x60]](https://www.dbi-services.com/blog/wp-content/uploads/2022/08/MOP_web-min-scaled.jpg)
![Thumbnail [90x90]](https://www.dbi-services.com/blog/wp-content/uploads/2022/08/OLS_web-min-scaled.jpg)