By Mouhamadou Diaw
KVM virtualization uses a kernel-based virtual machine (KVM) to create a virtualized environment for your Linux applications.In this blog I want to share some tasks I did at a client.
The client is using ODA 19.12. The databases are created on the bare metal and for the applications, we decide to create virtual machines.
What do I need for a VM creation?
-VMstorage for the creation of vdisks
-Vdisks will be attached to the VMs
-Cpupools of type VM to allocate cpu to the VMS
-Virtual network for the VMS, but here we are using the pubnet Virtual network
-Location of the iso (In my case I downloaded the Oracle Linux 7.9 V1009690-01.iso)
Let’s go
-Create VMstorage
The first step is to create the vmstorage which will contain the vdisks for VMS. This can be done using odacli create-vmstorage or using the GUI.
Log on to the URL https://ipaddr:7093/mgmt/index.html with your oda-admin then go the Compute Instances, select the VM storage tab and click on Create VM Storage and follow the process
Fill the info according your need

You can follow the status of the job like any other job
|
1
2
3
4
5
6
7
8
9
10
11
12
13
14
15
16
17
18
19
20
21
22
23
|
[root@oda-dev-01 ~]# odacli describe-job -i 8a49d40a-d9b4-4682-b550-49267241f0bdJob details---------------------------------------------------------------- ID: 8a49d40a-d9b4-4682-b550-49267241f0bd Description: VM storage storevms creation Status: Success Created: October 21, 2021 9:56:00 AM CEST Message:Task Name Start Time End Time Status---------------------------------------- ----------------------------------- ----------------------------------- ----------Validate Vm Storage doesn't exist October 21, 2021 9:56:00 AM CEST October 21, 2021 9:56:00 AM CEST SuccessCheck DiskGroup space October 21, 2021 9:56:00 AM CEST October 21, 2021 9:56:02 AM CEST SuccessCreate ASM volume October 21, 2021 9:56:02 AM CEST October 21, 2021 9:56:08 AM CEST SuccessCreate ACFS mount point October 21, 2021 9:56:08 AM CEST October 21, 2021 9:56:08 AM CEST SuccessCreate ACFS filesystem October 21, 2021 9:56:08 AM CEST October 21, 2021 9:56:12 AM CEST SuccessAdd ACFS filesystem to Clusterware October 21, 2021 9:56:12 AM CEST October 21, 2021 9:56:15 AM CEST SuccessAdd device to ACFS registry October 21, 2021 9:56:15 AM CEST October 21, 2021 9:56:19 AM CEST SuccessCreate VM Storage metadata October 21, 2021 9:56:19 AM CEST October 21, 2021 9:56:19 AM CEST SuccessPersist metadata October 21, 2021 9:56:19 AM CEST October 21, 2021 9:56:19 AM CEST Success[root@oda-dev-01 ~]# |
After the creation a new file system should be mounted
|
1
2
3
|
[root@oda-dev-01 ~]# df -h | grep storevms/dev/asm/storevms-415 700G 1.8G 699G 1% /u05/app/sharedrepo/storevms[root@oda-dev-01 ~]# |
Your vmstorage can be listed
|
1
2
3
4
5
|
[root@oda-dev-01 ~]# odacli list-vmstoragesName Disk group Volume name Volume device Size Mount Point Created Updated -------------------- --------------- --------------- ------------------------------ ---------- ----------------------------------- ----------------------- -----------------------storevms DATA STOREVMS /dev/asm/storevms-415 700.00 /u05/app/sharedrepo/storevms 2021-10-21 09:56:19 2021-10-21 09:58:38 GB CEST CEST |
-Create vdisks
The VMS will need vdisks. These vdisks should be created from VMstorage. The vdisks can also be created with command line or GUI.
In the GUI select the Virtual Disks TAB and the click on the Create Virtual Disk button
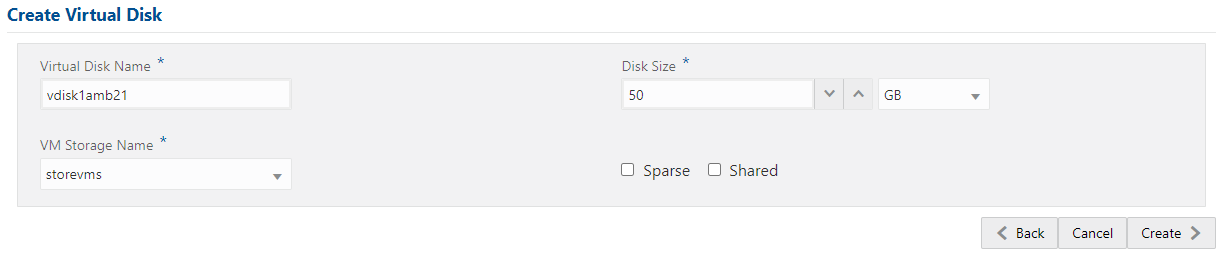
Be sure that your job finished successfuuly
|
1
2
3
4
5
6
7
8
9
10
11
12
13
14
15
16
17
18
19
20
21
22
|
[root@oda-dev-01 ~]# odacli describe-job -i 0fd66080-41fe-46d4-b257-56d9b68cd0a3Job details---------------------------------------------------------------- ID: 0fd66080-41fe-46d4-b257-56d9b68cd0a3 Description: VM disk vdisk1amb21 creation Status: Success Created: October 21, 2021 10:14:22 AM CEST Message:Task Name Start Time End Time Status---------------------------------------- ----------------------------------- ----------------------------------- ----------Validate Virtual Disk doesn't exist October 21, 2021 10:14:22 AM CEST October 21, 2021 10:14:22 AM CEST SuccessValidate Vm Storage exists October 21, 2021 10:14:22 AM CEST October 21, 2021 10:14:22 AM CEST SuccessValidate Vm Storage space October 21, 2021 10:14:22 AM CEST October 21, 2021 10:14:22 AM CEST SuccessCreate Virtual Disk snapshot October 21, 2021 10:14:22 AM CEST October 21, 2021 10:14:22 AM CEST SuccessCreate Virtual Disk directories October 21, 2021 10:14:22 AM CEST October 21, 2021 10:14:22 AM CEST SuccessCreate Virtual Disk October 21, 2021 10:14:22 AM CEST October 21, 2021 10:15:30 AM CEST SuccessCreate metadata October 21, 2021 10:15:30 AM CEST October 21, 2021 10:15:30 AM CEST SuccessPersist metadata October 21, 2021 10:15:30 AM CEST October 21, 2021 10:15:30 AM CEST Success[root@oda-dev-01 ~]# |
|
1
2
3
4
5
6
|
[root@oda-dev-01 ~]# odacli list-vdisksName VM storage Size Shared Sparse Created Updated-------------------- -------------------- ---------- ---------- ---------- ----------------------- -----------------------vdisk1amb21 storevms 50.00 GB NO NO 2021-10-21 10:15:30 2021-10-21 10:15:30 CEST CEST[root@oda-dev-01 ~]# |
-Cpupool creation
For cpu allocation to the VMs, we create cpupool creation of type VM.
If the GUI is used, Just select the CPU Pool section and click on Create CPU Pool
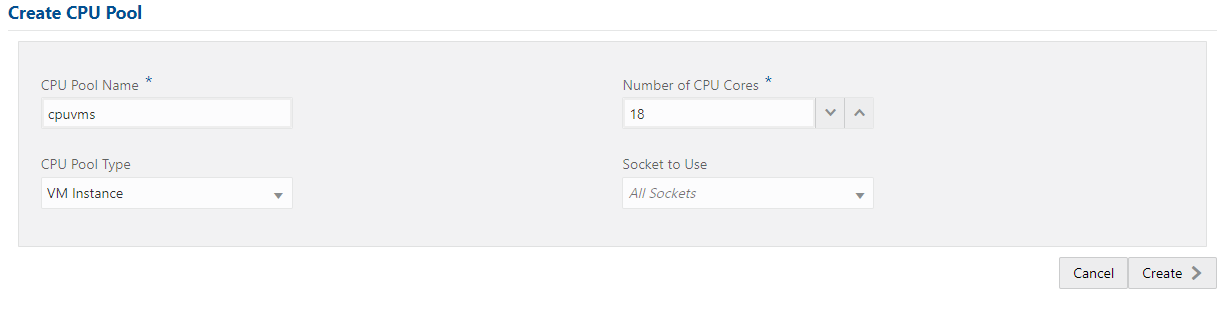
After the job runs successfully, we can list our cpupool
|
1
2
3
4
5
6
7
|
[root@oda-dev-01 ~]# odacli list-cpupoolsName Type Configured on Cores Associated resources Created Updated-------------------- ------------------ ------------------------- ----- ------------------------------ ----------------------- -----------------------cpuvms VM oda-dev-01 18 amfi-webt21, amfi-webs21, 2021-10-21 10:37:15 2021-10-21 10:37:15 amfi-b21 CEST CEST[root@oda-dev-01 ~]# |
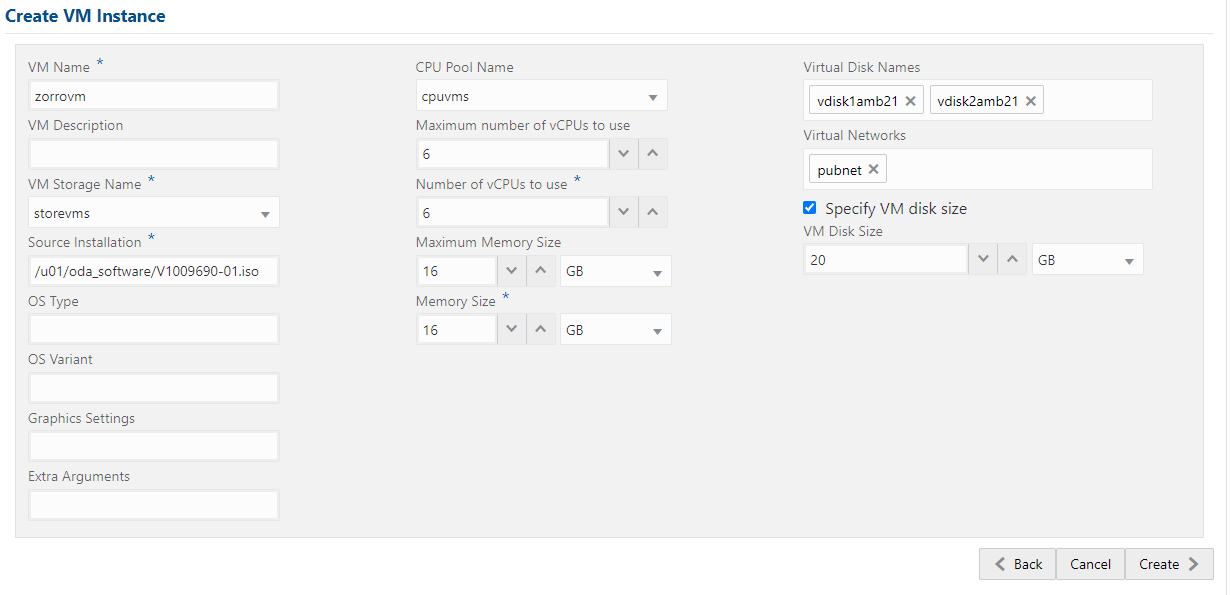
-Virtual machines creation
Now it’s time to create our virtual machine. This be done using command line or using the GUI.
In the tab VM Instances choose Create VM Instance. And fill the info
We can see
The Vms will have 2 disks attached : vdisk1amb21 and vdisk2amb21
The system will use a disk of 20G for the linux installation
The iso location is /u01/oda_software/V1009690-01.iso
The 2 vdisks can be formatted later for the usage.
To finish the installation, we have to enable a VNC session from the ODA
|
1
2
3
4
5
6
7
8
9
10
11
12
13
14
15
|
[root@oda-dev-01 ~]# vncserver -interface 192.168.168.15You will require a password to access your desktops.Password:Verify:Would you like to enter a view-only password (y/n)? nA view-only password is not usedNew 'oda-dev-01:2 (root)' desktop is oda-dev-01:2Starting applications specified in /root/.vnc/xstartupLog file is /root/.vnc/oda-dev-01:2.log[root@oda-dev-01 ~]# |
Once connected to ODA via VNC, we will again need to connect to the VM via VNC, for this we need to have the listen info for the VM.
Here we can see that the VM is accessible on 127.0.0.1:0 from the ODA.
|
1
2
3
4
5
6
7
8
9
10
11
12
13
14
15
16
17
18
19
20
21
22
23
24
25
26
27
28
29
30
31
32
33
34
35
36
37
38
39
40
41
42
43
44
45
46
47
48
49
50
|
[root@oda-dev-01 ~]# odacli describe-vm -n zorrovmVM details-------------------------------------------------------------------------------- ID: 9782e19e-51dd-4823-8c50-36be9d232e49 Name: zorrovm Created: 2021-10-21 10:45:54 CEST Updated: 2021-10-21 10:45:54 CEST VM Storage: storevms Description: Backoffice Test VM image path: /u05/app/sharedrepo/storevms/.ACFS/snaps/vm_zorrovm/zorrovm VM size: 20.00 GB Source: V1009690-01.iso OS Type: NONE OS Variant: NONE Graphics settings: vnc,listen=127.0.0.1 Display Port: 127.0.0.1:0 Status-------------------------- Current node: oda-dev-01 Current state: ONLINE Target state: ONLINE Parameters-------------------------- Preferred node: NONE Boot option: NONE Auto start: YES Fail over: NO NUMA enabled: NO Config Live ------------------------- ------------------------- Memory: 16.00 GB 16.00 GB Max Memory: 16.00 GB 16.00 GB vCPU count: 6 6 Max vCPU count: 6 6 CPU Pool: cpuvms cpuvms Effective CPU set: 1-9,17-25,33-41,49-57 1-9,17-25,33-41,49-57 vCPUs: 0:1-9,17-25,33-41,49-57 0:1-9,17-25,33-41,49-57 1:1-9,17-25,33-41,49-57 1:1-9,17-25,33-41,49-57 2:1-9,17-25,33-41,49-57 2:1-9,17-25,33-41,49-57 3:1-9,17-25,33-41,49-57 3:1-9,17-25,33-41,49-57 4:1-9,17-25,33-41,49-57 4:1-9,17-25,33-41,49-57 5:1-9,17-25,33-41,49-57 5:1-9,17-25,33-41,49-57 vDisks: vdisk1amb21:vdb vdisk1amb21:vdb vdisk2amb21:vdc vdisk2amb21:vdc vNetworks: pubnet:52:54:00:e2:d2:36 pubnet:52:54:00:e2:d2:36[root@oda-dev-01 ~]# |
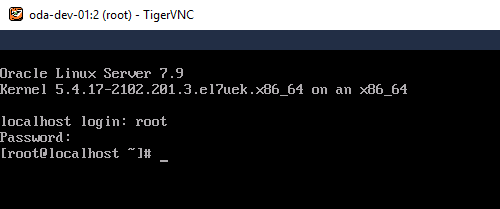
So let’s connect to the ODA via VNC
|
1
|
[root@oda-dev-01 ~]# vncviewer 192.168.168.15:2 |
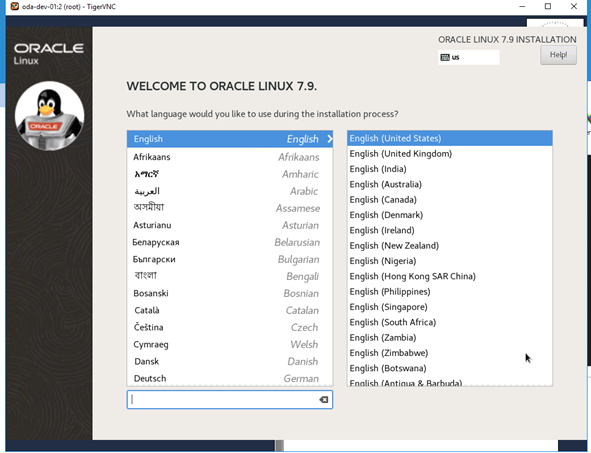
And once connected, let’s run a second vncviewer to access the VM envionment

And then we can now the launch the Linux install
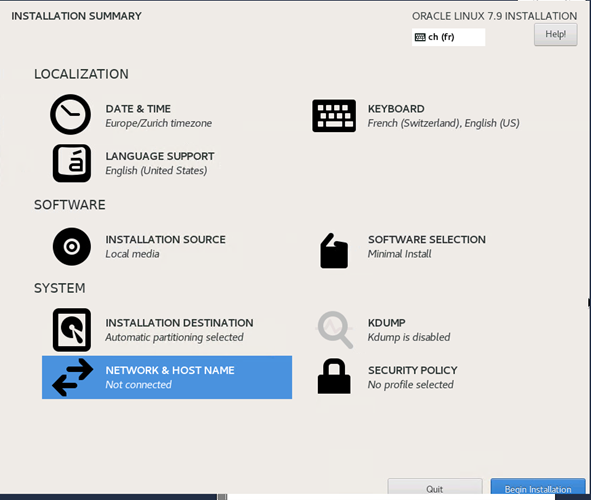
After the installation we can again use VNC to connect the VM and configure the network. But I highly recommend configuring the network during the installation, so you will be able to connect to the VM using putty. With VNC, I had many difficulties to find the right keyboard.
|
1
|
[root@oda-dev-01 ~]# vncviewer 192.168.168.15:2 |
Conclusion
Creating virtual machines on the ODA server can help you to optimize the use of you server. Because if you have enough space, you can just create virtual machines for your applications. You can find more info in the documentation
I hope that this blog will help
![Thumbnail [60x60]](https://www.dbi-services.com/blog/wp-content/uploads/2022/12/oracle-square.png)
![Thumbnail [90x90]](https://www.dbi-services.com/blog/wp-content/uploads/2022/08/DWE_web-min-scaled.jpg)
![Thumbnail [90x90]](https://www.dbi-services.com/blog/wp-content/uploads/2022/08/JDU_web-min-scaled.jpg)